Thursday, May 31, 2012

Amulets and Talisman Charms

I have said it before, and it is so true, I am addicted to charm making right now.  It is so quick and gratifying and they are especially fun to swap.  A new swap for Amulet and Talisman charms in my group was too good to pass up.

 My first set started out with a really great product called Style Stones.  I purchased them at a close out sale at a steep discount, as it is typically a pricey product.  They are made from actual stone and they accept many mediums very well. 


I started out by using neutral toned alcohol inks on both sides.  The edges were coated in Inka Gold which I simply applied with my fingers.  A stamped script holds the perfect words for the owner of this tiny talisman.  On the other side is a spiral marking that was imprinted with a stamp I hand carved.  The spiral represents evolution and holistic growth; letting go, surrender release and connectivity with divine energy and source.

A small copper ring dangles from the hand embellished stone.  The copper holds characteristics such as love, balance, feminine beauty and artistic creativity.  The ring  is a nod to wholeness, unity, revolution and completion. 


The second set were made from beads I purchased at an estate sale.  Here is a picture of what they looked like before I altered them with my magic potion.  This picture was never intended to end up in a blog post (it was from a text message)...but I thought I would showcase what they looked like before.  There were quite a few larger beads which I kept to make some different pieces with.


My magic potion is this amazing aging solution that was given to my by one of my employees.  Since it is meant to age a product, we could say that it will add the element of wisdom to this talisman.  It was also used in these Day of the Dead skulls I made last fall.  It gives the beads, which I am pretty sure are bone, wonderful depth and character.  Bones represent the foundation of the self, the inner truth.  They can also represent death and rebirth. 


I added another dangling element off of my charm more movement, in this case a small red glass flower.  The red representing love and the flower opening up.  A Chinese coin was also attached to add good fortune.  Again the circle is prevalent in this charm with the jump rings as well as the patterns on the beads representing wholeness.    

In writing this post, I also realized I had not shown these ocean themed charms off.  They were made for my local art group.  I love using the picket fence stain  and Guilders Paste on metal with a bit of sealer. 


I am excited to see the return on the Amulets and Talisman charm swap, it will be an amazing charm bracelet I do believe!  I will be showing off what I did with a few of my Springtime in Paris charms soon.  I have been working on a big project and I am really excited to start showing it off.

Cheers,

Rhea

Saturday, May 26, 2012

Postal Charm

I simply adore all things postal.  I love to imagine the journey that a piece of living ephemera has taken to get where it is.  I love the stamp, the date, the age, the wear, the way the envelope was opened, the handwriting, the surprise of another bit of accidental ephemera....I could go on and on...

Well I am sure my charming friends will not be surprised that I signed up to make two sets of ten charms for one of the latest swap offerings.  I experimented with my first set by gluing two stamps together and dipping them in UTEE.  They were really cute until I attempted to add a hole and cracked them...a wonderful failed experiment.


The first set here were really simple.  I simply added an old stamp image with some glossy accents and put packing tape on the back to seal it a bit.  These domes are made of glass and they magnify the image.  I tired to find stamps with interesting postmarks.


I like the fun nature theme on this set.  I adore the one with the tree.  


This lot is filled with women.  I love the one at the top with Virgin Mary. 


No particular theme with these ones.  Just super simple, super cute little charms.  I am so addicted to making them!


In this set I played with new materials, which was so much fun.  The back of this set is scrap leather.  I picked up a few bits at an industrial outlet type store on the super cheap.  I glued on a stamp and then added a layer of mica, another new fun thing to play with.  A vintage eyelet from a recent estate sale, along with a bit of guilders paste and these were done.  


I like the color the paste adds, I think it helps add to the story of my little charm. 


Just think of all the stories, messages and words of love all these little stamps carried.  And how fun to create another little memory of my creation to the mix.  

Thanks for stopping by and sharing some inspiration with me!

Cheers, 

Rhea


Sunday, May 20, 2012

Playing in the mud

I have been having the most fun with clay of late.  My new obsession started a few weeks ago when a gal pal invited me to "Pizza and Mud" at a local studio called The Firehouse.  We had a lovely evening, making sunshine bird feeders.  I did not like the look of the open mouth, so I altered the plan and just made a simple sunshine.


If I had it my way, I would have worked on my facial features a lot more.  I had to just accept where I was at when time was up.  This was really hard for me!  I can really get lost in a project for hours. 

Another clay adventure I recently took, was following a tutorial from Pixie Hill.  You can see what I made the first time around here.  I really enjoy using the Paper clay.  I love this medium and I can see myself really getting lost in the possibilities of what can be made.  When one of the owners of the Rusty Rabbit saw my teeny, tiny houses and mushrooms she asked me to make some larger ones. 


I happy complied and used up the rest of the package of Paper clay.


These little decorations are going to be added to small eclectic succulent gardens for a special touch of garden whimsy.  How fun is that!

Thanks for stopping by to share a moment of inspiration with me.  I hope your summer season is off to a lovely start!
Cheers,

Rhea

Saturday, May 12, 2012

Sea Shrine Tutorial

As many of you know assemblage work is a genre that I love.  It takes patience as there are often many steps to prepping pieces but this is what really gives a project character.  I will provide a loose guide and some key thoughts while showing a few specific techniques in making this lovely little Sea Shrine I created from my very first design team kit from Alpha Stamps.


Here is what I started off with, a small 6x6 shadowbox I had in my stash.  It looks quite like a small dresser drawer.  I love that it is real wood, so it accepted several mediums quite well as you will see.


Start by distressing your shadowbox somehow.  I chose to add several (3) coats of Picket Fence stain along with Guilders Paste rubbed along the edges and on the hardware.  The inside of my box was painted with a pearl color acrylic paint and then spritzed with some light blue shimmery ink sprays (not pictured).  I typically strive to do two or three techniques to give elements of my project depth.


Once I was satisfied with my base, I planned for my focal.  I was immediately attracted to sea shore collage sheet from Alpha Stamps.  The focal image of choice was glued on to another piece of card stock before fussy cutting to add a bit of strength.


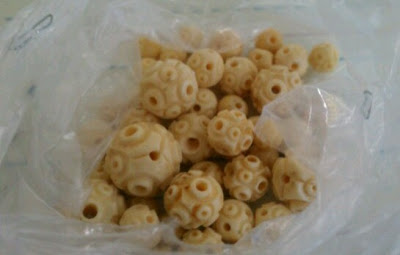
I had the idea to cut away the shell image and dig into my stash for a real one.  Then I raided my beads and found some vintage pearls, added in some tiny real seashells as well as some tiny glass spheres.  E6000 was the glue of choice here as the stuff I was gluing was "chunky."  I like to use that  in this instance as it does set up fairly quickly.  Matte medium and Glossy Accents are also good go to adhesives for the assemblage artist.


Set your focal aside to dry for a bit and plan for assembly, I love this stage.  I wanted my shell focal piece to be in a bank of sand.  To this end I used a bit of paper clay that I molded to form a slope.  Remember, paper clay shrinks.  You will not have a perfect imprint once your clay is dry, be advised.  Once your form starts to dry a bit, I recommend taking it out of the box to dry quicker.  I am inpatient, to speed up the drying of the clay even more, I baked it in the oven at 250 until hard.  It took mine a good hour due to the thickness of the piece.  


Now is the time to attend to collaging the background in your piece.  This is another opportunity to add layers and interest.  This time around I played with the seaweed fiber set and layered in some collage sheet elements from the sea shore collage sheet and K and Company's varnished postage stamp paper.   I used matte medium to glue down my fiber bits. Then I gathered items to assemble into the project.


Keep in mind it is a good idea to include things that are of a different scale, this is how you achieve interest.  Also items tend to look better placed in odd numbers.  I used E6000 to start gluing in my ocean treasures.  I was sure to audition each piece before adding glue to them.  Shells, starfish, a bottle of garnet sand, sea glass and more tiny shells are all fun items to include.  Most of these smaller items were glued down with matte medium.  I find that this disappears the best and really does hold pretty well.  Inside of my sandy bottle I included a secret note and a few tiny clam shells and tiny seahorses.


I made a handy sandy paste that dries rock solid and I think will have many crafty uses.  Here is the recipe:  one part Glossy Accents, one part matte medium and two parts sand.  I simply mixed it in a small resealable container and I just keep adding to it when I start to run low.  My measurements are rough and approximate, you can tell when the mixture starts to thicken too much, you want it to still have some viscosity.


Slather on your paste behind where your focal is going to land, filling in any edges from the paper clay shrinkage.  I used a popsicle stick.  Add glue for your focal and place it where you would like, for this large piece I used E6000.  I added a bit of my sand formulation over the edges of the shell and over the rest of the paper clay bank.  I think this helps it to blend, and it works as an extra adhesive.  I also added more tiny real seashells at this point, making sure they had good contact and were wet with adhesive. 


To finish off my box I added a decorative border of shells.  I also glued down some brass shell corners and a brass shell scroll that were altered with Liver of Sulphur Gelguilders paste and then a coat of picket fence stain. Yet another great example using the rule of three when distressing an element for a project.

I hope you learned a little something along the way.  Assemblage art is such a fun way to tell a story, thanks for joining me as I tell mine.

Cheers,

Rhea

Wednesday, May 9, 2012

Down the Rabbit Hole: Part II

So I was called long ago by my inner artist to revisit this piece and it seems the moon and the stars aligned to make this happen.  Alpha Stamps is the sponsor this month for the challenge over on The Altered Alice blog, which is a really fun place to explore. Everyone who enters in the monthly challenge will get a free collage sheet too!   

Have you ever made a project and called it complete, only to keep fantasizing about what else needed to be done to it?  That was the situation with this assemblage.  It was one of my earlier pieces and it was intended as a swap, but it never left my possession as I fell in love with it, and with the story.  You can read more about the first version here.


It was a good exercise to look back at this post and this piece and evaluate my growth.  I think the quality of my pictures has vastly improved.  


Quite a nice pick me up, if I do say so.  First off the color reflects the vibrancy of the Alice story so much more now.  I added dozens of red paper roses and used the mini playing cards to hide my glue and wire.  My old shrine was missing a nod to the Cheshire Cat.  Using the Red Queen Collage Sheet took care of that and added a good bit of that color with new imagery in other areas too.  


A few new trinkets were added to the project as well.  I have been wanting this tiny tiny teapot with hinged lid ever since I laid eyes on it.  I absolutely adore it. Notice too that the tiny door opens.  I just adore movement in my work.   


The gold rabbit bead was a nice addition to the area with the mushroom.  In the first run, there was a spot open where the bunny was that I thought needed to be filled.  Unfortunately I had run out of the particular color of mossy stuff that I used. The rabbit covered this issue up nicely.  


You may also notice the change in the wood color.  I used vintage photo distress stain and stained the whole thing.  I do not recommend doing this after an assemblage is complete, by the way, it was a bit challenging.  A few roses are now a bit aged! The stain warms up the piece considerably and goes well with the new vibrant tones.  


Thanks for joining me on my re-do.  I hope this post inspires you to revisit that piece that you often look at thinking it needs just one more...

Cheers, 

Rhea


Tuesday, May 8, 2012

Bathing Beauties

My very first design kit from Alpha Stamps was a beachy delight.  This month they are sponsoring a "Wish you were here" postcard swap.  You can find more information about it here.  I made several samples, delighted with all the fun imagery. 


I absolutely adored the travel adhesive borders.  I did not even use them as intended, I left them on the card stock backs as I did not realize until later that they were stickers.


On the back of the card on the left I used this cool wire mesh to capture some shells and glue it on my card.  The product is kind of like a tube of mesh, so I was able to tuck things inside.  


I really love this card.  I used lots of Dresden borders in a nice shell motif. I love this image too.  


I kept this once pretty simple.  I really liked the imagery.  Here are more of the adhesive travel borders, along with a sticker from the Tropical Travelouge line from Graphic 45.  


The last one is really fun.  I just freely collaged from all of the images I cut out when I got my design kit.  Sometimes it is freeing just to put stuff down and not be attached to the outcome.  I think this is why I am really loving collage journaling right now.   

Stay tuned for more beachy goodness on my blog.  I have a tutorial coming soon with Alpha Stamps! 

Cheers, 

Rhea

Thursday, May 3, 2012

A visit to Pixie Hill

One of the best benefits about being involved in online crafty communities is the ability to connect with others and share inspiration.  I learn so much from my fellow bloggers and artists.  Being a part of Alpha Stamps Yahoo group, provides tons of benefits.  There are secret sales, great swaps, challenges and a wealth of inspiration being shared among very talented artists.  Once of them is Nichola Battilana, of Pixie Hill.  Her work is stunning. She creates teeny tiny bits of assemblage that will attract fairy folk from near and far.  Nichola generously shared with the Alpha Stamps Yahoo group how she makes these lovely treasures and I wanted to share what I was able to make.


I made a ton of items to use in my domes.  Unfortunately, many of them were too large to squeeze inside these tiny Domed Apothecary Bottles from Alpha Stamps.  I know I will find a use for them though.  Nichola's must be even tinier.  She has some houses and mushrooms inside the same tiny space!  Mine are a bit crowded, but I love them anyway.  


I borrowed a nest from one of my birds to make a quick little fairy town to show of  the rest of the elements I made.  I could have made mushrooms for days.   


I adore the red mushrooms.  My polka dots are wonky and not the same consistent size, but oh well.  Embrace imperfection!  I also should have done two coats of red paint.  I am really impatient for an assemblage artist.  


Pretty darn cute in my humble opinion!  Thank you so much to Nichola for sharing her expertise.  The Yahoo group is open to anyone, so feel free to stop by and join us for some inspiration, great swaps and great product.  


Cheers, 

Rhea