Wow, it feels like it has been a while! I guess my creative mojo took a little break, probably because my work life has been a bit challenging of late. I made the time to check out
Linda's Grungy Monday challenge which is always inspired by none other than Lord
Tim. This week was a Distress free for all and I really enjoyed it.
I was inspired to make this project for a swap I am enrolled in, but this is another project I kind of grew attached too. It just may live with me for a bit, we shall see as I have some time. I just love how I was able to really flesh out this theme with supplies I had on hand.
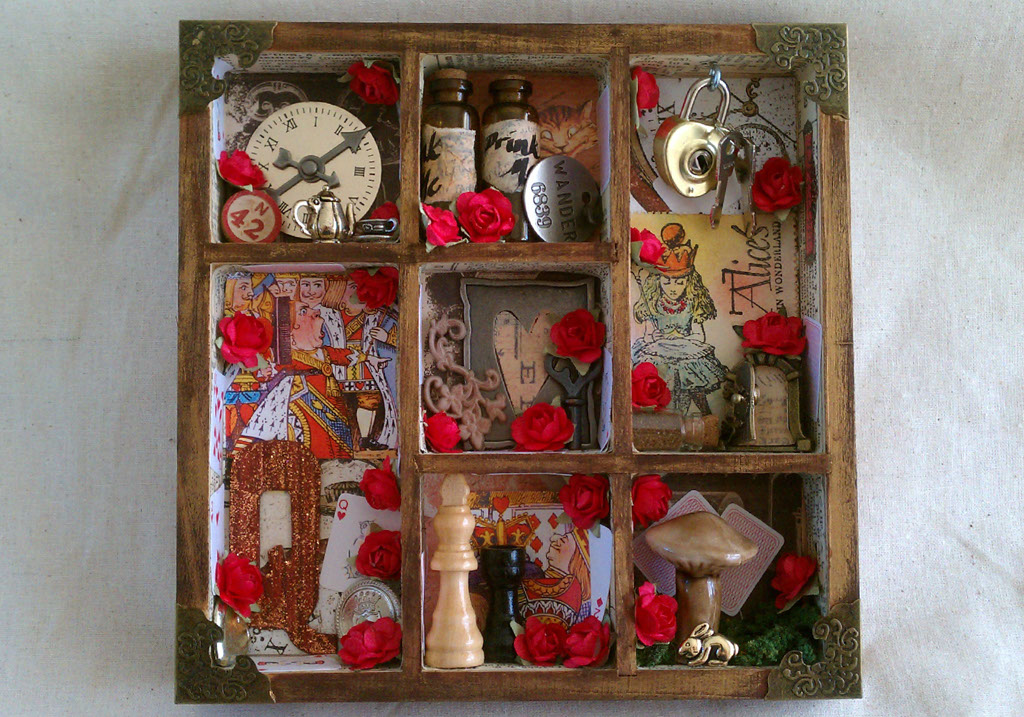
I started with this box I had on hand that was ready to alter. This was sent to me in a swap and had been filled with a ton of lovely hand carved stamps. I still have to move the hangers on the back because I had to change the orientation in order for the images I had to fit properly. As I look at this, I realize quite a bit of the materials used were from swaps. People send me the coolest stuff!
The background paper was glued inside of each part of the background. Tim Holtz's tissue tape frames out the inside of each square. Then came the Distress inks. I used a bunch of brown tones and buffed them into the front and sides of the raw wood. Since Distress inks react with water, I spritzed the inks to get them to intensify and blend more. I also added a touch of rub and buff along the front for a little sheen.

At this point, I added some metal corners from Tim. Then it was stash scavenging time, fun. I had just received the faux Alice stamps in a mail art swap. They were a bit bright for the project, so enter a bit more Distress inks along with some additional colored pencil. The mushroom was recently picked up at an antique show for a dollar. The faux moss also just arrived in the mail from a swap as did the tiny bottle filled with "the sands of time" (shielded by the open door.) I really like to have movement in my work. To this end I also attached the heart shaped lock with a tiny eye bolt, yep, someone sent me that lock too.

In the middle area I knew I wanted to use some of my small brown bottles. I bought oodles of them at a good discount. I bit of paper, some ink and a "drink me" label and I had some potion for my project. A philosophy tag from Tim also goes with the theme. I looked and looked for something that said "dream," but I could not find anything on hand. I later did add this word from a bit of paper on an inner wall (not seen.) I knew I also wanted a playing card in this piece too. Due to the waxy coating it would not accept ink, I got around this by sanding and I love the texture this process achieved. A few random wooded chess pieces that arrived in my mailbox (from a swap) fit perfect with the theme. The metal heart was a garage sale find I believe. I really wanted to fill the metal heart with red distress stickles. I did this, but I lost my patience as they take a while to dry, so I altered my plan and moved forward. The flourish was sent to me and the key, I think I had.

Now, I have a tiny heavy metal printers "Q" that I wanted to use, but I was supposed to send this internationally, so I did not add it. It probably made a good choice as the scale of the large grungboard letter works better. It was colored with Distress Inks and coated in stickels. I glued it down when the glitter was still wet, I am so impatient with my art at times! A cheap plastic heart shaped locket was tucked in and a royal button add some interest in this taller box.
I knew I wanted something to do with time. I used a Spare Part clock face and a few spinners from Tim. The tiny teacup I just received in a swap as well. In fact, I think this little cup and the faux postage really inspired the whole project. When trying to add elements, I read the wiki entry of the plot synopsis to refresh my memory of both Alice in Wonderland and Through the Looking Glass. I found that Alice in sighted "rule 42" at the royal court. I searched my vintage bingo pieces and lucked out.
There is room for a few more trinkets in my opinion and there are a few story elements I would like to add. Some red and white roses and a rabbit would be nice for sure. A tiny pair of gloves or a fan would also complement the theme. This is an image rich tale for sure, there are so many things I could see doing with this theme in the future. So this is what the "Alice" hub-bub is all about! Now that I have fallen in love and plan to keep it, I just may be able to continue my search and find the finishing touches.