Showing posts with label bunny. Show all posts

Saturday, March 28, 2015

Spring Shadowbox


So recently Graphic 45 featured the nicest spotlight on me!  Not only did we have to answer a few questions, but we had to make a tutorial in our favorite crafting avenue.  I chose to make a small shadowbox with Raining Cats and Dogs and the snapguide is below.


The color palate in this line is great.  There is so much contrast.  It makes for a busy project, but I usually like lots of layers!


The metal flower above was faux enameled.  This gives it so much texture and age. The same technique was used on the filigree below.


I found yet another place to sneak in those cute red mushrooms.  I just adore those things!


The resin butterfly below has some patina colored gilders paste added to highlight the edges.  It also helps to bring it more into the intended color palate.  


Thank you so much for stopping by!  Happy Spring to you! (at least there is sunshine in Michigan...but it is still way too cold.)

Cheers, 

Rhea

Friday, March 20, 2015

Springtime Bunny Box


This project was recently featured in Graphic 45's newsletter. I thought it made for a fun piece of springtime decor, but it could easily be modified for any season, holiday or even a memory.


For this project I used Time to Flourish. This paper line is beautiful and super versatile too!


For those of you who are interested in seeing how this was put together I have created a snapguide for you to check out.  There are so many great tutorials on this site!


I absolutely adore the lace sticker edging I used on this project.  Sad that it was the last bit I had in my stash...  Another great trick here:  I used a layer of 7 gypsies tissue paper that I covered in resin over the bunny rabbit that I cut out of chipboard.  This makes for a cool textural element.


I was super happy to have finally used one of my resin bezels I made a while ago with lots of Graphic 45 goodies sealed inside.  


I hope you enjoyed today's springy offerings!  I know one thing for sure, here in Michigan we sure are happy it is indeed the first day of spring!

Cheers,

Rhea

Friday, March 29, 2013

Spring Cubby


Spring has "officially" sprung finally in Kalamazoo, Michigan!  The sun is out, the birds are chirping and even thought it is chilly, I have a few windows open to welcome some fresh air.  I thought I would celebrate by showing of this fun spring assemblage I recently made for Alpha Stamps.   


This Masonite cubby has 35 small partitions that are one inch square.  I have filled them with all kinds of delightful treasures that remind me of the season at hand.  As I assembled this piece I tried to keep a tighter color palate that was outside my usual range with blue, yellow and pink.


One way to make your pieces unique is to alter your elements along the way.  Above, you can see where I added colors to my bee with liquid pearls.  Also notice on the resin flower towards the top where I used gilders paste.  It works great on all types of surfaces beyond metal such as resin and wood.


I just adore all the cotton spun mushrooms I used throughout the piece. I am not sure why I  obsess over these, but I truly love them.


Lots more altered metal elements down on this section.  The bunny is colored with a bit of alcohol ink to add some depth.  


Overall this piece is probably much smaller than you would ever imagine in real life.   Even though it is small, it is packed with all kinds of spring fun though.
Cheers, 

Rhea

Friday, March 22, 2013

Bunny Dome


One of my recent scores in an Alpha Stamps design team kit was this great plastic dome.  There were also lots of other spring goodies tucked in the package, so that became the theme of my cute little dome.  All of the items used can be found here.


I started out by making a nice mossy borough for my little rabbits.  The back of the piece is built up a bit to maximize the height of the inside.  The flowers were actually added for tallness as well.  I tried to go without them, but it looked too empty inside.  


The bottom was covered in decorative tape and stickels.  I attempted to cover up all of the black plastic base.  I wish I had tried some ribbon or something with a bit more texture.


You may notice that some of the metal is colored.  I used liquid pearls to add a bit of sheen to mother rabbit as well as the baby carrots.   Those tiny rabbits are brads, if you can believe it.  I loved them so much, they were gone in moments.  

Even though I have been posting of spring, it still eludes us here in Michigan.  I am more than ready for the change! 

Cheers, 

Rhea

Friday, March 15, 2013

Altered Eggs


I was really inspired by these paper mache eggs from Alpha Stamps.  The first one I made is a bit quirky, but fun nonetheless.  This winged egg has lots of Tim Holtz hardware and a few filigree to make for a slightly steampunk look.  I originally cut a hole in the front to try to do something inside of the egg, but it did not work, so the window was added instead.


The second project that I finished is a hinged egg with a few surprises inside. 


The outside is simply colored with distress stain in silver.  I cannot rave enough about those stains.  Simple decorations were added by way of stickers and tinsel.


Inside the egg there are two little spring nests.  I absolutely love the tiny bunnies, which are actually brads.


Opposite is a more traditional spring nest with a brass bird and tiny eggs.


Perhaps posting of spring and Easter-ey things will help it to arrive a bit sooner in Michigan, boy am I ready!

Cheers,

Rhea

Sunday, March 10, 2013

Tattered Floral Spring Box


This project is really an interesting revival for me.  The idea and the theme really echos my very first true mixed media assemblage, so it was fun to reinterpret for this challenge.  Tim Holtz recently posted a call to use his tattered floral steel rule die and I could not resist participating, and walking down memory lane.


The base of the project is a library drawer from 7 gypsies.  Lots of patina colored gilders paste was added to the wood as well as many other elements in the piece.  


Above you can really see some of the flower detail.  Lots of techniques were applied to get to the end result.  I used alcohol inks, gilders paste, embossing and distressing along the way.  The stems were free form sculpted before gluing down.


I just love the tiny cute little bunnies on either side of the sign.  The bird above was cut from some metallic plastic industrial waste that I altered with Vintaj patina and several layers of gilders paste.  


Here the embossed texture of the flower can really be seen.  The floral centers are Tim Holtz door knobs.  It was so hard to use them up, but I had to tell myself it was for a good cause.  I also love the butterflies I made with Graphic 45 butterflies, Dresden scrap and Tim Holtz pen nibs. 


I chose tissue tape to line the inside of the box.  This choice was made because I find it so easy to apply to the pesky edges.  It also helps to carry out the mixed media look. 


Just for fun, here is my first mixed media piece I was speaking of earlier.  For a bit more info here is the link to that post: Steampunk Springtime.

Thanks for stopping by as always.

Cheers, 

Rhea  


Wednesday, May 9, 2012

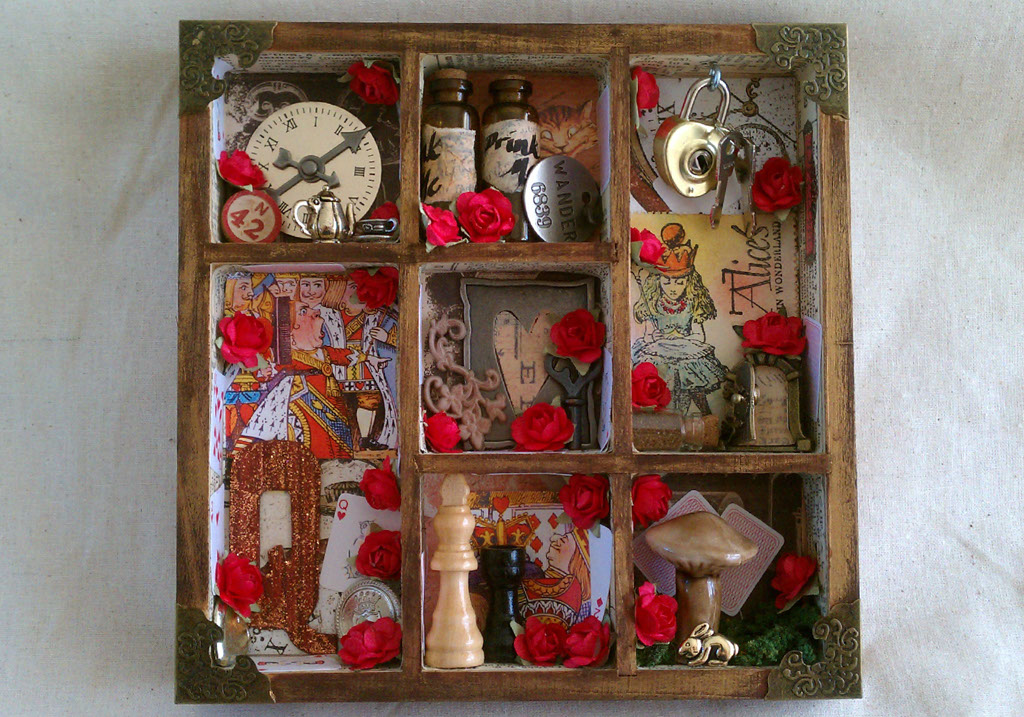
Down the Rabbit Hole: Part II

So I was called long ago by my inner artist to revisit this piece and it seems the moon and the stars aligned to make this happen.  Alpha Stamps is the sponsor this month for the challenge over on The Altered Alice blog, which is a really fun place to explore. Everyone who enters in the monthly challenge will get a free collage sheet too!   

Have you ever made a project and called it complete, only to keep fantasizing about what else needed to be done to it?  That was the situation with this assemblage.  It was one of my earlier pieces and it was intended as a swap, but it never left my possession as I fell in love with it, and with the story.  You can read more about the first version here.


It was a good exercise to look back at this post and this piece and evaluate my growth.  I think the quality of my pictures has vastly improved.  


Quite a nice pick me up, if I do say so.  First off the color reflects the vibrancy of the Alice story so much more now.  I added dozens of red paper roses and used the mini playing cards to hide my glue and wire.  My old shrine was missing a nod to the Cheshire Cat.  Using the Red Queen Collage Sheet took care of that and added a good bit of that color with new imagery in other areas too.  


A few new trinkets were added to the project as well.  I have been wanting this tiny tiny teapot with hinged lid ever since I laid eyes on it.  I absolutely adore it. Notice too that the tiny door opens.  I just adore movement in my work.   


The gold rabbit bead was a nice addition to the area with the mushroom.  In the first run, there was a spot open where the bunny was that I thought needed to be filled.  Unfortunately I had run out of the particular color of mossy stuff that I used. The rabbit covered this issue up nicely.  


You may also notice the change in the wood color.  I used vintage photo distress stain and stained the whole thing.  I do not recommend doing this after an assemblage is complete, by the way, it was a bit challenging.  A few roses are now a bit aged! The stain warms up the piece considerably and goes well with the new vibrant tones.  


Thanks for joining me on my re-do.  I hope this post inspires you to revisit that piece that you often look at thinking it needs just one more...

Cheers, 

Rhea


Saturday, February 12, 2011

Bunnies and Chicks everywhere!

I recently finished creating pages for my second chunky book swap.  The theme for this one is Vintage bunnies and chicks.  I am looking forward to seeing how our book turns out once assembled.  Here is a shot of all my pages.


For some reason, I just love interactive features.  So in order to appease this interest of mine, I decided to use library pockets and tuck a little tag inside.  I do love how they peek out a bit.  Hopefully they will also add interest to the finished book.  On the back of the tag I affixed my swap card too, which has all of my contact information.

The background paper for this page is from Graphic 45's Once Upon a Springtime collection.  This paper was really my starting point and inspiration for my page.  The bunny/chick images are from Tim Holtz's Seasonal paper stash.  I liked that using these gives each page it's own little image for the pocket as well as the tag. 


I also used some die cut embellishments to add some different shapes and break up all the linear lines.  I am not usually one to use this type of store bought "ephemera" but I think it works well on this project.  I did distress all along the way. Coloring edges with inks, distressing edges and adding wear and tear are all ways to add a weathered feel to projects. 


Another great technique I tried, was to seal my pages with Tim Holtz's tissue tape.  This was another way to add texture and keep my pages together.  So interesting that just this very morning Tim posted on his blog a mini book that uses this same idea on the edges of the pages!  I guess great minds think alike.  I am in love with tissue tape!!!


The back of my page is very simple, very unusual for me!  I typically add layer upon layer of stuff in my work, as you have probably noticed.  I know I need to learn to edit a bit, so perhaps this is my first step.  However, of course, my creative voice is telling me that this side still needs something else...

I had planned on doing a packing tape image transfer with these little bunnies on the back.  Perhaps I did not do it right, because the first one I peeled, yielded no image.  I embraced the issue and just left the packing tape on my images and fussy cut them out.  I think that this technique still adds a bit to the page.

Come back later to see the finished project!!!