Sunday, October 11, 2015

Magical Woman


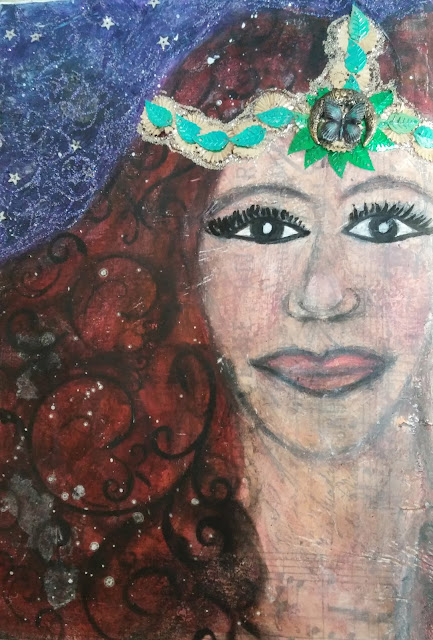
This is admittedly quite different for me!  I do not usually use people in my art, let alone try to draw them.  After a few You Tube videos on "how to draw" a few different things, I set out to create my journal page for a round robin I am in locally.  The theme of this book is Magical Women.


Since I am not present at the meetings to share my techniques, I thought I would write about a few things I did here.  It feels good to dust off the old blog!  To start out this page I added a layer of Tim Holt's tissue paper with soft gloss gel.  I then followed with a thin coat of white gesso.


Next came sketching with pencil while watching many videos.  I had to just make peace with some elements I was not happy with.  I then started to add some flesh color and hair lines with oil pastels. Pitt pens, brush markers and whatever was in my art journal tackle box added lots of elements to this mixed media spread.


To get the stencil pattern on the hair I used Pan Pastel in black, it added a great texture.  The purple/blue background started off with some acrylic paint, but also ended up with oil pastels and gelatos before I was happy with the shade.  I used a fixative before adding in my stickel swirls, and glued on sequins.  There was a bit of flicking done with a white paint pen as well somewhere in the process.


My magical women was inspired by "The Mists of Avalon," one of my favorite books with strong magical women.  Those that resided on the isle were marked by crescent moons on their foreheads.  I am hopeful the recipient likes my entry in her magical book!

Cheers,

Rhea

Thursday, September 3, 2015

Steampunk Heart Hanging


The inspiration continues after learning so much from Finnabair!  I have also used a lot of her product in this project as well since I am on such a kick.  It was great getting back to a classic steampunk look, my absolute favorite!


The focal of the piece is actually a Masonite kit from Retro Cafe Art that I have been hording for some time.  I added Finnabair's silver micro beads and lots of layers of resin to achieve really great dimensional wings.  For the mica heart I made a great discovery.  I was able to dye my mica with alcohol inks prior to using them to customize the color.  This opens up so many possibilities with the mica I have on hand!


The heart also has lots of Finabair's mechanicals which were also coated with resin.  I love to layer the metal pieces to achieve different looks.


The base of this hanging is a burlap panel.  I love how this provides for a natural texture to begin with.  I also used lots of die cuts, Masonite shapes, metal bits, found objects and wooden embellishments in the collage.  All of it was brought together with the use of gesso, a dusting of metallic finishes and some mica flakes.


I made this piece specifically to keep my big designing dreams alive.  I have not been active with a team for a while and it is part of my creative life that I truly miss!

Cheers, 

Rhea

Sunday, August 30, 2015

Mechanical Row Houses


These fun little houses have lived in my mind for some time now, so I was pleased to finally take the time to make them.  I used small wooden house shaped blanks along with a ton of products from Prima and Finnabair to create these sweet mixed media treasures.


To start things out I primed my houses with black gesso.  I then added my roof lines with 3D Gloss gel and Black Sand Texture Paste, both such dreamy products.  The versatility of the gel is amazing, I was able to use it both with her glitter and mica flakes.


I love the texture of the roof tops.  The sand paste is especially fun for this application.  And yes, it took a really long time to dry!


I went a little nuts with the silver micro beads again too.


There are two more of these fun houses in process, but I just could not wait to show them off to you all!

Cheers,

Rhea


Friday, August 28, 2015

Brave Girl Canvas


I have been a long time fan of Melody Ross and her various online classes.  I love her style and the meaningful messages she sends through her art.  I set out a few weeks back to create a canvas that embraced a little bit of her style and some of her teachings and this is what I created. 


I loved using a different color palate than I usually do.  This took me outside of my typical artistic output right away, but it was perfect for the project. I used lots of embellishments I had on hand, and I created my own with the use of letters, tissue paper and scraps. 


There are many layers in the background that made for lots of texture.  I used stencils along with gel medium and gesso to create lots of interest.  To bring some of my layers back out and outline my collage elements, I used pencil and even permanent marker to color the raised parts and make marks around certain shapes. 


Here is a close up of one corners of the piece so you can see all the wonderful layers. It is not perfect!  There are some things that I would have considered mistakes or issues in the past.  I have learned to embrace these imperfections as that is what makes it my own.
 
I hope you liked what I shared today!  It is so nice to be back in the land of inspiration again!
 
Cheers,
 
Rhea


Sunday, August 23, 2015

More Finnabair Inspiration


Hello folks!  Sorry it has been a bit quiet on the blog this month!  It has been a wonderful summer filled with vacation days, long weekends, and a little bit of art respite for me.  Sometimes it is best to embrace the quiet times as when my mojo returns, it usually does so with fervor.


I am here today to show off some more work that incorporates a ton of Finnabair products and some of her techniques.  I have decided to also take a creative risk and try out for her design team. I long for deadlines, project constraints and a creative clan that designs and inspires a community of like minded people. When I am doing this, I am so happy!


I created this canvas piece specifically for this entry.  It shows my hidden dream in the corner.  There are layers and layers of mediums on top of a burlap panel.  This provided for great texture in the background.  Some of the mediums used include Black Gesso, Clear Texture Paste, 3D Gloss Gel and silver micro beads. 


As you can see I used a ton of Finnabair's metal embellishments, along with the mediums.  Her pieces are perfectly made for layering to create interest.  I wanted to cover up the place where I tied on the hanger, so combined some of Finn's pieces to some coveted buttons.  I love when a treasure finds the perfect home.  


Now this book I made straight away after taking several of Finnabair's classes.  I was so inspired from her teachings as well as a recent trip to the Detroit Institute of Arts to see the Frida and Diego art exhibit, that I decided to make a book blending these ideas.  The book is actually for a round robin, so it will travel and many people will work in it.


I am happy to report that it is quite sturdy due to the use of the 3D Gloss Gel.  I also layered on lots of micro beads and mica further cementing down my dimensional elements.  This gives me some piece of mind as it makes it's way around my art circle.  


The texture that was created by the Black Gesso base is amazing.  I think it has to do with the book I used.  It was puffy and leathery and perfect for this project.  Before adding the layer of gesso, I primed the book with a layer of 3D Gloss stenciling to make a background.  Then I sanded the 3D Gloss circles which made them appear to have a shaded effect.  

It has been so refreshing coming back to my blog with new knowledge and inspiration!  Thank you so much for following along!  I appreciate your readership as always!

Cheers, 

Rhea


Saturday, July 18, 2015

Finnabair classes!


I was so excited when I discovered that a scrapbook shop called Scrappy Chic in Livonia, Michigan was going to be hosting Finnabair in July. I decided to have a little art binge and take all the classes and I am so glad I did.  So here I am fresh from two full days of fun, with four classes total and I am here to show off my work.


First up was "Daydreamer."  This was a collage on canvas using darker effects, which I absolutely loved.


As you can see Frida Kahlo was my focal.  I recently went and saw the Frida and Diego exhibit at the Detroit Institute of Arts, so I took lots of inspiration from there. I thought she was the perfect subject for the large headdressess that are signature Finnabair sytle.


The next course was called Over Emotional.  I liked having the chance to stretch myself a bit with an alternate color palate and style. While I don't think it is something I would repeat in terms of color, I am pleased with the outcome.


On of my favorite tricks used in lots of classes lately is adding some pencil at the end.  It is amazing how this small element can really change the level of detail on a piece. You can see some of my doodling at the bottom here.


So much rich and fun texture.  There is so much for the eye to take in on every one of these projects.


The start of day two was a Rich and Textured Layout class (gasp).  I don't think that there has ever been a layout on my blog, because this is just not my thing.  I decided to go with it anyway since I had traveled for the classes and I was glad I did.  There were still lots of techniques and products to try out.  The kits for the classes were beyond amazing, I am so pleased with what I still have left!


The image here came from my dad's stash.  Since he is an antique dealer he has a ton of junk.  I told him about my project and I got a slew of fun cabinet cards to play with! Score!


Last up was the ARTifact.  This was clearly my favorite, with no people to worry about as I am actually not much for featuring people in my work.  Anyhow, the focal here was a paintbrush, again provide by going through dad's junk.  Lots of fun industrial touches were added by the way of gears, nuts, bolts and even some great metal wings.


What an amazing two days of artful bliss!  Thanks so much to Scrappy Chic and of course to Finn for a beautiful presentation of classes. I am so glad I made the trip.


Cheers,

Rhea

Thursday, June 25, 2015

Abandoned Art!


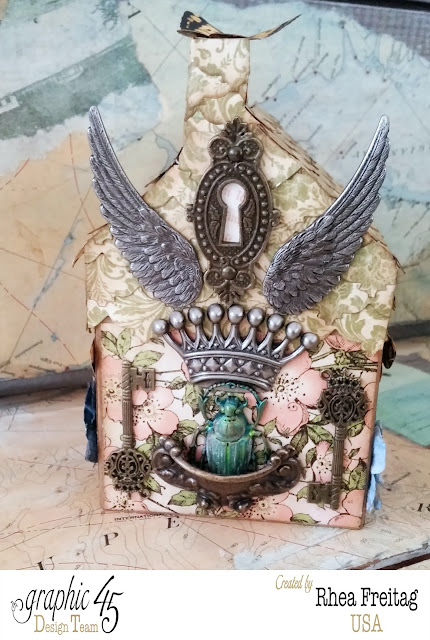
I had made this project quite awhile ago for Graphic 45 and it was recently shared in my awesome farewell post.  I could not believe the outpouring of love and comments, it is something I will certainly treasure.  Anyhow, I decided that this project needed to be abandoned in the wild for someone else to enjoy! It always feels good to put a little love out into the world.


What started as a Facebook Group has evolved to an "art movement" with "art abandoneers" all across the world.  There is even a book that has been published! It is really fun to see the amazing things that people leave as a beautiful random act of kindness.


I had been carrying around my little house for several days with the intent to leave it somewhere, but I could not find the right spot.  My day job took me to Lansing for a meeting and I had the idea to see if I could drop it in a really urban location.  This interactive art piece was a perfect spot. There is a tag on the back of the project explaining that it is free art and contact information to report their experience if they choose.


Here are additional photos of my project.  I love the roof that I made with a die cut by Tim Holtz, it turned out so super cute.


There is lots of metal added to the front of this little fairy house.  I also used a lot of fussy cutting and flowers to add more texture and interest.  


I sure hope that someone out there is enjoying their little bit of abandoned art!

Cheers,

Rhea

Sunday, June 14, 2015

Art all weekend with Kristen Robinson


So I am totally blissed out on art!  I have just returned from a lovely art filled weekend at Smittendust, a beautiful art studio in Diamondale, Michigan.  Dusty, our hostess, had Kristen Robinson teaching classes all weekend long and I indulged in every one of them.  


Dusty made each class participant a name tag filled with relaxing lavender.  What a great token to remember this weekend!  Above you can also see a super sweet tiny house made by Kristen that I won in a raffle.


Day one was right up my alley with the first offering called A tale in my heart - plaster, wax and paperclay shadowbox.  We actually made two pieces as the class progressed.  Kristen is so generous in her teaching and her super duper class kits. 


I love all the interesting texture achieved my mixing all the techniques offered.  I am definately inspired to play with plaster and wax in the future for sure thanks to my exploration during this class.


Day two was Divine Bangles and the title was aptly named.  We did so many different things through the course of the day such as etching, soldering and adding patina.  We also fold formed and did some basic metal working techniques.  As you can see not everything is complete, I have a bunch more wire and some assembly to do soon and I am really looking forward to it.


Then on to day three with Grunged up and Glamorous - Upcycled Journal.  I had so much fun playing with these ideas and techniques.  


There are lots of transparent elements through the use of packaging, upcycled materials and glassine. I loved adding lots of stitching with a sewing machine too.  Thanks to my art gal Joanne for sharing and a few teaching moments on her machine too.


One of the stickers from our cute kit boxes wandered into my book.  It is a sweet reminder of the day and this little junk journal is the perfect home for it.


These pages are filled with all kinds of fun.  I used resin paper, strings, feathers, tatted butterflies...whatever I could find to create texture and interest.


I was able to utilize lots of resin elements I had on hand.  Finding the opportunity to incorporate previously made components is always a good thing.


Here is another peek at my fantastic book as a whole.  It is really something that needs to be seen in person, the pictures just do not capture how special it really is.


Thanks to all who actually made it to the end here!  It was such a great weekend and it really did deserve a nice long homage!  If you are ever offered the chance to take one of Kristen's classes, I highly recommend it.

Cheers,

Rhea


Sunday, June 7, 2015

House Shrine


So yesterday one of my art pals, Andy, posted a "permission slip" to go to your studio to make art on Facebook. This is the result of my play time yesterday and I am so pleased with the outcome.


The base was from the wood section of a big box craft store.  I had primed it with black gesso long ago, and today was the day that leg work paid off.  The jumping point on my basic technique was when I started to edge the house with Ultra Thick Embossing Enamel (UTEE) in bronze.  I realized that I could make the look of patina by adding in a little turquoise Iced enamels while the UTEE was still hot.


In this image you can see how I made my Tim Holtz hardware match the project with the use of Vintaj patina.  I also love the little heart embellishments.  They are made of wood and I used more Iced Enamels, this time in ivory to create some contrast.  A vellum heart cut out by Heidi Swap was layered on each heart for extra detail.


This bee bezel I made a few weekends ago found it's home along with some other metal bits and pieces from B'sue Boutiques.  Again, the use of the patina helps to bring everything together and create a cohesive look even with different metals.


As you can see I got really crazy with the UTEE.  I ended up doing the whole outside of the house with the stuff.  To add some texture I used a script stamp while the UTEE was still hot.  To blend it a bit, I used the heat gun over the stamped words to erase and blend some of the texture back. More patina was added and wiped off to make the letters pop.


My intent was to create lots of depth by having different layers of embellishments.  I mounted the focal butterfly on a box lid so it would stand out from the back.  The heart banner was made from a scrap of cardboard that was embossed and distressed.  It was a challenge to solve the bottom of my shrine, I got stuck a few times on my composition, but in the end I worked it all out!


Here you can see the inside edges just a bit.  Layers of tissue tape and stickles make for lots of texture.  Also you can see a tiny glimpse of the embossed metal that I used in the very back.

This was such a fun piece to create and share.  I hope you found some inspiration along the way!

Cheers,

Rhea