Showing posts with label mushrooms. Show all posts

Saturday, March 28, 2015

Spring Shadowbox


So recently Graphic 45 featured the nicest spotlight on me!  Not only did we have to answer a few questions, but we had to make a tutorial in our favorite crafting avenue.  I chose to make a small shadowbox with Raining Cats and Dogs and the snapguide is below.


The color palate in this line is great.  There is so much contrast.  It makes for a busy project, but I usually like lots of layers!


The metal flower above was faux enameled.  This gives it so much texture and age. The same technique was used on the filigree below.


I found yet another place to sneak in those cute red mushrooms.  I just adore those things!


The resin butterfly below has some patina colored gilders paste added to highlight the edges.  It also helps to bring it more into the intended color palate.  


Thank you so much for stopping by!  Happy Spring to you! (at least there is sunshine in Michigan...but it is still way too cold.)

Cheers, 

Rhea

Saturday, April 27, 2013

Imagination is Boundless: Graphic 45


I have super exciting news to share:  I imagined, I dreamed and I achieved:  I am now a member of Graphic 45's 2013 Design Team!  The shock is just starting to wear off, two days post announcement.  I am so excited to take part in this elite team.  I am sure that I will learn a lot and create a lot as a result of this appointment.  


I thought this little box I made for Alpha Stamps was a nice little piece to show off in celebration.  The sentiment surely fits.  There is also one of my last coveted metal staple butterflies from G45 in there. :)

Thank you all for your well wishes and incredible support through this whole process.  Let the next phase of my artistic journey begin!

Cheers,

Rhea


Saturday, August 11, 2012

Yes, this really is my Bead Soup post!

Well, first off I am so sorry to be late.  I almost did not post anything at all, due to a trip planned after I had signed up for this event.  I really enjoy doing this blog hop so I thought I could fit it all in, but alas I could not.  I have half of an amazing charm bracelet completed, but it just was not going to happen in time.  So this morning, I took the advice of my crafting pal Joanne Huffman and made a simple assemblage with my focal.

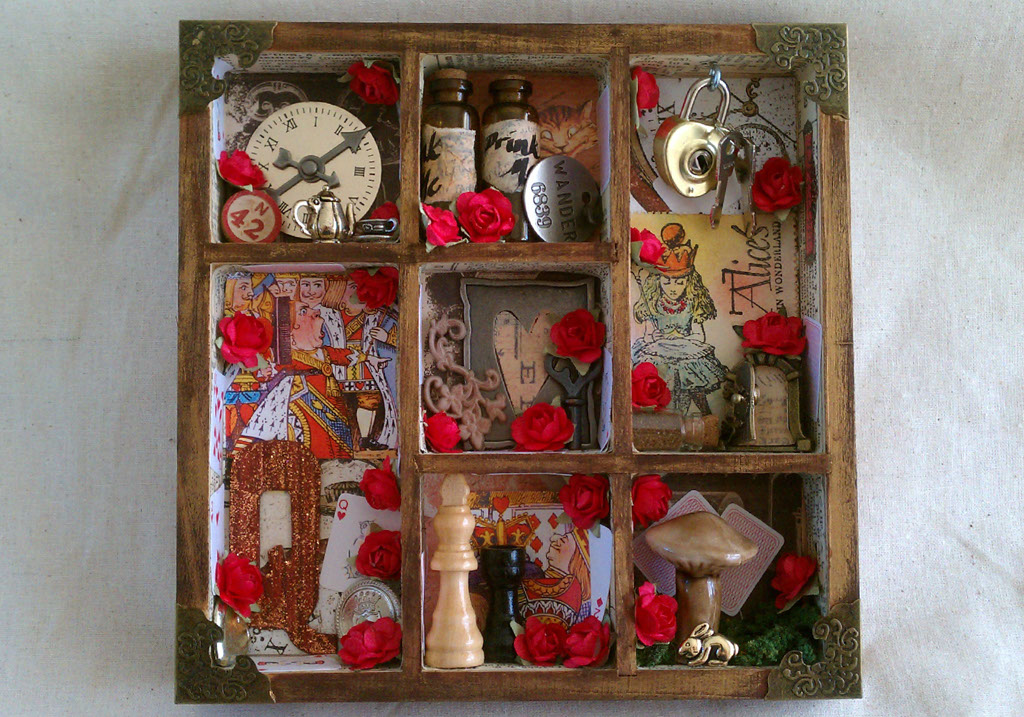
Here is what I was sent by my partner Tanya Wiles.  The piece that she made from what I sent her is really lovely, so please take the time to stop by and leave her some blog love!


As I said before, I started an intricate charm bracelet, but just could not finish it in time.  The amazing hand forged clasp was already attached and I had already used up all those yummy flower beads, so unfortunately they did not make it into my little assemblage where I used my focal.  I know this does not align with the expectations of the hop, but I conceded this morning that something was better than nothing!  I hope you all understand.  Lori, I am so sorry!  Please be sure to stop by Lori's blog here to see what she is up to and also gain access to the blog addresses of all the participants!


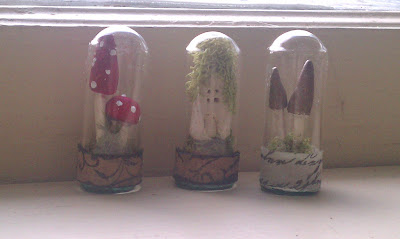
Now, I really can't take credit for this idea either.  The house here was made by a wonderful artist Nichola Battliana.  She generously sent me a bunch of goodies a while ago and I thought this was the perfect venue for my cute little fairy home.  The concept was totally hers as well! :)  Thanks for the inspiration Nichola!  She makes wonderful (and way more intricate) teacup dwellings and sells them on her etsy shop.  Please stop by her shop to see her wonderful whimsical work.

The teacup in my piece was actually picked up on my recent trip to Michigan's Upper Peninsula.  I was on the hunt for them due to Nichola's inspiration.  In the north country we have garden gnomes or wee people who help animals.  This cup was found at the last rummage sale I hit on my way out of town.  I could not resist going to one more sale that I saw across the street from my favorite pasty shop, and it payed off.

During my time up north I visited lots of spots that were "Pure Michigan." (cue music...Michiganders, you know what I am talking about...)  I spent time in Crystal Falls and Copper Harbor, I visited the monks for thier sweets at the Jampot and dipped my toes in cool lakes.  I spent quality time with extended family at our camp, ate thimbleberries and raspberries right off the bush, combed beaches for agates, and read three books.  I took in local art, fresh local fish and farm fare, paid respects to my elders and drank strong coffee over rich conversations.

The statement is so true: "If you seek a pleasant peninsula, look about you."


Cheers,

Rhea  

Tuesday, July 10, 2012

Magic from Pixie Hill

It is confirmed! I have been visited by a boatload of official Pixie Hill inhabitants and magic is afoot indeed.  One of my amazing design team colleagues sent me a lovely parcel of goodies, just for trying out her techniques.

Some of you who follow along may recall my turn down the paperclay path as documented here.  Now I had fun, and I even made a few cute items...but nothing like the work that they were inspired by.  Here is the entire lot.  Lots of this is available in her Etsy store right now!


My favorite, hands down this little trio of amazingness.  So super cute.


This little vignette is darling as well.  I wonder if she sent me what appears to be a rhea bird stamp on purpose? :)  The little fabric book is simple and precious.


All these cards are marvelous.  I can't wait to send one or two off to some artsy pals.  The gal kicking her leg in the corner is staying with me though!


There was even a print in the mix, with toadstools too. I just adore that she uses all those red and white mushies!


Nichola Battilana, you are so very special.  I appreciate your giving nature, your whimsical inspiration and magic that you create. Your parcel arrived today after a most harrowing day, and you just don't even know how much it touched me.  Thank you so very much!

I am so very blessed and honored to have connected with all of you on the AS team!

Cheers,

Rhea

Sunday, May 20, 2012

Playing in the mud

I have been having the most fun with clay of late.  My new obsession started a few weeks ago when a gal pal invited me to "Pizza and Mud" at a local studio called The Firehouse.  We had a lovely evening, making sunshine bird feeders.  I did not like the look of the open mouth, so I altered the plan and just made a simple sunshine.


If I had it my way, I would have worked on my facial features a lot more.  I had to just accept where I was at when time was up.  This was really hard for me!  I can really get lost in a project for hours. 

Another clay adventure I recently took, was following a tutorial from Pixie Hill.  You can see what I made the first time around here.  I really enjoy using the Paper clay.  I love this medium and I can see myself really getting lost in the possibilities of what can be made.  When one of the owners of the Rusty Rabbit saw my teeny, tiny houses and mushrooms she asked me to make some larger ones. 


I happy complied and used up the rest of the package of Paper clay.


These little decorations are going to be added to small eclectic succulent gardens for a special touch of garden whimsy.  How fun is that!

Thanks for stopping by to share a moment of inspiration with me.  I hope your summer season is off to a lovely start!
Cheers,

Rhea

Wednesday, May 9, 2012

Down the Rabbit Hole: Part II

So I was called long ago by my inner artist to revisit this piece and it seems the moon and the stars aligned to make this happen.  Alpha Stamps is the sponsor this month for the challenge over on The Altered Alice blog, which is a really fun place to explore. Everyone who enters in the monthly challenge will get a free collage sheet too!   

Have you ever made a project and called it complete, only to keep fantasizing about what else needed to be done to it?  That was the situation with this assemblage.  It was one of my earlier pieces and it was intended as a swap, but it never left my possession as I fell in love with it, and with the story.  You can read more about the first version here.


It was a good exercise to look back at this post and this piece and evaluate my growth.  I think the quality of my pictures has vastly improved.  


Quite a nice pick me up, if I do say so.  First off the color reflects the vibrancy of the Alice story so much more now.  I added dozens of red paper roses and used the mini playing cards to hide my glue and wire.  My old shrine was missing a nod to the Cheshire Cat.  Using the Red Queen Collage Sheet took care of that and added a good bit of that color with new imagery in other areas too.  


A few new trinkets were added to the project as well.  I have been wanting this tiny tiny teapot with hinged lid ever since I laid eyes on it.  I absolutely adore it. Notice too that the tiny door opens.  I just adore movement in my work.   


The gold rabbit bead was a nice addition to the area with the mushroom.  In the first run, there was a spot open where the bunny was that I thought needed to be filled.  Unfortunately I had run out of the particular color of mossy stuff that I used. The rabbit covered this issue up nicely.  


You may also notice the change in the wood color.  I used vintage photo distress stain and stained the whole thing.  I do not recommend doing this after an assemblage is complete, by the way, it was a bit challenging.  A few roses are now a bit aged! The stain warms up the piece considerably and goes well with the new vibrant tones.  


Thanks for joining me on my re-do.  I hope this post inspires you to revisit that piece that you often look at thinking it needs just one more...

Cheers, 

Rhea


Thursday, May 3, 2012

A visit to Pixie Hill

One of the best benefits about being involved in online crafty communities is the ability to connect with others and share inspiration.  I learn so much from my fellow bloggers and artists.  Being a part of Alpha Stamps Yahoo group, provides tons of benefits.  There are secret sales, great swaps, challenges and a wealth of inspiration being shared among very talented artists.  Once of them is Nichola Battilana, of Pixie Hill.  Her work is stunning. She creates teeny tiny bits of assemblage that will attract fairy folk from near and far.  Nichola generously shared with the Alpha Stamps Yahoo group how she makes these lovely treasures and I wanted to share what I was able to make.


I made a ton of items to use in my domes.  Unfortunately, many of them were too large to squeeze inside these tiny Domed Apothecary Bottles from Alpha Stamps.  I know I will find a use for them though.  Nichola's must be even tinier.  She has some houses and mushrooms inside the same tiny space!  Mine are a bit crowded, but I love them anyway.  


I borrowed a nest from one of my birds to make a quick little fairy town to show of  the rest of the elements I made.  I could have made mushrooms for days.   


I adore the red mushrooms.  My polka dots are wonky and not the same consistent size, but oh well.  Embrace imperfection!  I also should have done two coats of red paint.  I am really impatient for an assemblage artist.  


Pretty darn cute in my humble opinion!  Thank you so much to Nichola for sharing her expertise.  The Yahoo group is open to anyone, so feel free to stop by and join us for some inspiration, great swaps and great product.  


Cheers, 

Rhea

Sunday, March 25, 2012

Big news and a tiny specimen

My dear followers,

I have been sitting on the most amazing news for over a week now, and it has been excruciating.  I have been accepted to Alpha Stamps Design Team!  This company is so very special, and I can't believe I can say I am a part of their team.  They have an amazing online store, a wonderful supportive Yahoo community and they engage their customers with the most wonderful  and creative art swaps.  I assure you they have top notch customer service and a wonderful staff as well!  

This project actually features some great products available at Alpha Stamps.  I started with a shrine kit and the cutest tiny mushrooms I purchased from Retro Cafe Art.  I added apothecary domes, paper from Graphic 45's Old Curiosity Shoppe, as well some other embellishments I had on hand.


I used rub and buff to add some shimmery interest to the edges of the shrine.  I really appreciate the texture this adds.


I wanted to show a image that included the edges.  Here I used a bit of tissue tape from Tim Holtz to add some visual interest. Distress stain along with a bit more rub and buff was added to this element to ensure that it blended in with my chosen palate.  You can also see that the butterflies on the bottom add some dimension.  I added a bit of foam from a kids door hanger to pop the images from the background.  I had a use what you have moment there!


I finished off the project with some metal embellishments and trinkets I dug out of my stash and I am pleased with the outcome.  Once again, I had to coax myself into cutting into that Graphic 45 paper as it is just so pretty. 

I can't wait until my first Design Team kits arrives!  I am sure it will be filled with tons of crafty inspiration which I look forward to sharing with all of you.

Cheers,

Rhea