Monday, October 28, 2013

Happy Haunting Houses


And fall is officially well under way!  The arrival of Halloween this week means that those cold cozy days will be upon us in no time. Graphic 45 challenged the team to come up with some easy Halloween decorating ideas and this is what transpired.  


For this project I was inspired to upcycle something I had in my existing stash.  These painted wood houses from a rummage sale had been on hand for quite some time and I knew they would be a perfect fit for this project.  Since I still have more on hand I am thinking I could do several season and change out the display.


To start, I simply covered each house in black gesso.  A layer of paper on each side made for a perfect base for my simple collage.  Notice how I chose to use the positioning of the paper to create a fence on the back side of the house.  


I used some acrylic paint on the edges to give the houses a bit of a grungy look.   It was so hard for me to use that starry paper.  I have been hanging on to the two sheets I have forever.  Alas, I now only have scraps.


The owl cuts outs are from Retro Cafe Art.  Kristen has a ton of cut outs that make for awesome artsy elements.


I hope you are inspired to look at some of your stash in a new way. 

Happy Halloween!  

Rhea


Friday, October 25, 2013

Steampunk Spells Handmade Book Tutorial


This little Steampunk Spells book I made for Graphic 45 was so easy to alter and I am going to show you just how I did it, so be sure to check out the tutorial in my post. 


Supplies:
Old Book
Steampunk Spells 12x12 paper
Steampunk Spells 8x8 paper
Steampunk Spells Chipboard 1
Steampunk Spells Cardstock Stickers
Steampunk Spells Alphabet Stickers
Steampunk SpellsTags and Envelopes
Steampunk Spells Banners
Distress ink and Stain: Black Soot
Scor-Pal
Xyron Mega Runner
Seam Binding in Black and Spice
Craft Knife


For this project I was inspired to use the ribbon binding technique in yet another way.  This time I decided to upcycle an old book I had on hand.


To start out, I used a craft knife to remove the inside of the book.  Be very careful not to cut too deep.  Don’t forget to save the inside pages for other projects.  This text is in French, I think I forgot I even had this book in my stash. 


Next I chose a 12x12 piece of scrapbook paper for my cover. 


I cut the paper large enough for about an extra inch of paper surrounding the cover.  I have always been one to work around measuring. 


I used the Scor-pal to guide my creases for my folds to wrap the cover. 


A quick adhesive was used as I folded down all my edges.  I really love my recent discovery of “dry” adhesives!


Next I folded my spine to break it in a bit and I cut and scored my signatures. The paper will need to be just less than double the width of your desired page size.    The size will be dependent on your book.   You simply score down the middle of your paper so you can tie in your pages. 


For the last step, simply tie in each of your paper signatures.  I chose to use seam binding from Alpha Stamps.   This time I chose to go with classic bows instead of tying uniformly at the bottom.  I like the volume and texture the seam binding provides.   Now you have a fun altered book or photo album to document your spooky Halloween season.  


Happy Halloween folks, I hope you enjoyed and found a bit of inspiration. 

Cheers, 

Rhea

Sunday, October 20, 2013

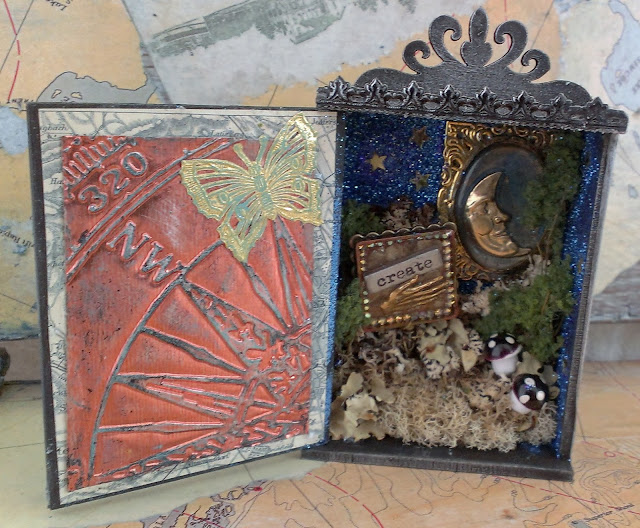
Door Shrine with Ice Resin


I have been itching to get back to assemblage making and that is just what I did over this past weekend. This is my favorite art form and I am not quite sure why.  I guess there is something to putting things together dimensionally that pleases my sense of creativity.


To start off I painted the whole shrine kit with black gesso.  I then added my classic touch of gilders paste in silver.


The ornament on the door of the shrine was made with Ice Resin and a few broken jewelry bits.  I had to layer the resin on twice to get the effect I was looking for.  I backed the door with text and a layer of mica to add more interest and create dimension.


The inside of the door is backed with a map and an embossed piece of Spellbinders metal sheeting, which was aged with more gilders paste.  I chose the image of the compass because for me this represents new direction.


My focals on the inside are made from a few resin creations I made this weekend as well.  Here I have used some very fun techniques to create interesting textures in the resin.  I have embedded mica and I also used perfect pearls to color the resin.

I hope you enjoyed my little Door Shrine, stay tuned for more dimensional assemblage, I was a busy bee this weekend!

Cheers,

Rhea

Thursday, October 17, 2013

Ice Resin Bee Necklace


I have been so excited to use the bezels Spellbinders sent me as they are a product partner for Graphic 45.   One of the focals I created includes this amazing Victorian bee brass stamping from Alpha Stamps.


In the background I have layered some text, which really ended up obscured by the mica I added.  I did manipulate the mica a bit to add texture, it really adds depth and dimension that is hard to see in this photo.


On the bee I used many products: gilders paste, Vintaj onyx patina, stickels and permanent marker.  The centerpiece was sealed with Ice Resin.  I had to do this in two settings to achieve the doming effect I was after, and get all of the body of the bee under resin.


I added the focal to a simple chain.  When I wore it for the first time today, this was how I styled it.  I can also chose to wear it in the center.  I tried to add several different elements, but I always ended up editing them out.  Sometimes it is good to keep things simple. 

It was so fun to get back to my jewelry roots, I suspect there is a bit more of that to come now that my dining room table has been transformed into a jewelry making station.

Cheers, 

Rhea

Wednesday, October 2, 2013

Halloween Banner with Packing Tape Transfer


Today I am going to show off a basic image transfer with packing tape.  This is a very simple technique that makes for a wonderful way to layer imagery. Here is a sneak peek of the finished project.


To start you need to be sure that your color copies are toner based.  Most printers for the home are ink jet printers and this technique will not work.  You can get your images printed off at a shop, or you can order them from Alpha Stamps and they will work perfectly.


As you can see from the inside label I used Scotch Sealing Tape.  I have successfully used this with regular old packing tape as well.  A non-stick craft mat is super handy for this project, but it can be done without.


Prepare your images.  Keep in mind that if there is a colored background, this will transfer too.  Since I did not want those backgrounds, I chose to fussy cut two of my images.  Add the tape on top of the image.


Burnish your images well with a bone folder.  This step is important.


Peel your work off the mat and spritz with water.  I let the water soak in for a few moments to saturate the paper.


Begin to rub off the paper with your finger.  I typically work from the inside out.  Add more water as you go and keep the paper very wet.


Continue to rub until the paper is gone.  Magically the ink is left behind on the tape.


Add your image to your chosen background.  You can see here that some of the stamped image is showing through, which is what makes this so cool.  If you had just fussy cut the image it would not look nearly as blended in.  Now these still had enough "stick" on the tape that I burnished them onto the pennants.  I would recommend adding them with matte medium though.


Check out those lovely embossed bats I used too.  Super fun and easy. I simply embossed an image on the black chipboard bat and then finished it with a rubbing of gilders paste.


I hope you enjoyed this fun and resourceful way to add imagery to your work.

Cheers,

Rhea