Showing posts with label shrine. Show all posts

Sunday, June 7, 2015

House Shrine


So yesterday one of my art pals, Andy, posted a "permission slip" to go to your studio to make art on Facebook. This is the result of my play time yesterday and I am so pleased with the outcome.


The base was from the wood section of a big box craft store.  I had primed it with black gesso long ago, and today was the day that leg work paid off.  The jumping point on my basic technique was when I started to edge the house with Ultra Thick Embossing Enamel (UTEE) in bronze.  I realized that I could make the look of patina by adding in a little turquoise Iced enamels while the UTEE was still hot.


In this image you can see how I made my Tim Holtz hardware match the project with the use of Vintaj patina.  I also love the little heart embellishments.  They are made of wood and I used more Iced Enamels, this time in ivory to create some contrast.  A vellum heart cut out by Heidi Swap was layered on each heart for extra detail.


This bee bezel I made a few weekends ago found it's home along with some other metal bits and pieces from B'sue Boutiques.  Again, the use of the patina helps to bring everything together and create a cohesive look even with different metals.


As you can see I got really crazy with the UTEE.  I ended up doing the whole outside of the house with the stuff.  To add some texture I used a script stamp while the UTEE was still hot.  To blend it a bit, I used the heat gun over the stamped words to erase and blend some of the texture back. More patina was added and wiped off to make the letters pop.


My intent was to create lots of depth by having different layers of embellishments.  I mounted the focal butterfly on a box lid so it would stand out from the back.  The heart banner was made from a scrap of cardboard that was embossed and distressed.  It was a challenge to solve the bottom of my shrine, I got stuck a few times on my composition, but in the end I worked it all out!


Here you can see the inside edges just a bit.  Layers of tissue tape and stickles make for lots of texture.  Also you can see a tiny glimpse of the embossed metal that I used in the very back.

This was such a fun piece to create and share.  I hope you found some inspiration along the way!

Cheers,

Rhea

Saturday, July 26, 2014

Cirque Shrine


Here is a fun little box I altered for Alpha Stamps.  The theme for the month of July is the Circus and that has been fitting as life has been just so busy this month!  Crazy stuff at work, fun times with friends and families planned, leading a healthier lifestyle and all that have been keeping my creative time at bay.  


For this theatre, I again used my trick of taping the entire outside instead of creating fussy templates to cover the odd shape.  I am always cutting corners in my creative work, it is one of my secrets...well not so much anymore.


To create a bit of magic in the background I used some champagne stickels on the curtains.  I also trimmed out my outside and inside frames with gold gilt.  I really loved using this stuff. 

Here's to hoping that things quiet down so I can get back to my precious artsy times my friends.  Thanks for sticking with me while it has been quiet.

Cheers!
Rhea

Wednesday, May 21, 2014

Winged Heart Shrine


I was thrilled to be offered the opportunity to play with the new Gilded Life charms and bezels for Alpha Stamps.  There is a list of supplies from Alpha Stamps here.


The hutch is covered with Tim Holtz tissue tape and then a layer of silver gilders paste.  I liked the way I could easily manipulate and apply the tape to the different surfaces.  It made for a quick covering of the base.


It is hard to see, but the inside of the shrine is layered with blue mica flakes.  I popped the focal heart out with a few scrabble tiles so it has the illusion that it is floating in the box. 


I used images from Alpha Stamps Butterfly Collage Sheet along with lots of metal staples from Graphic 45.


To alter this focal I started off with Tim Holtz Tissue Wrap and added my images.  I also altered the metal with Vintaj Patinas and then some stickles too.  You can also see how I added silver gilders paste to the different metal pieces to help them to look cohesive. 

I just adore how this turned out.  One of my favorite pieces in a long time.  I hope you enjoyed as well!

Cheers,

Rhea

Wednesday, November 6, 2013

Tiny shrine of Mary


A few weeks back I had shared that I had been on a shrine/assemblage kick again, this post shows off another bit of that art attack.  


I used an Alpha Stamps image that I printed to make a rub on and then adhered that to a sheet of mica.  I just adore how you can see the text through the image.  Yes, I am easily amused when it comes to art techniques that add so much interest in super simple ways!


The edges of the assemblage were covered with my standby, tissue tape.  I also used a ton of gilders paste on this project, in fact this is the only medium I used to color the elements. 


I gave my mom another small similar shrine with religious imagery, I think this one may be destined for her as well!

Cheers, 

Rhea

Sunday, October 20, 2013

Door Shrine with Ice Resin


I have been itching to get back to assemblage making and that is just what I did over this past weekend. This is my favorite art form and I am not quite sure why.  I guess there is something to putting things together dimensionally that pleases my sense of creativity.


To start off I painted the whole shrine kit with black gesso.  I then added my classic touch of gilders paste in silver.


The ornament on the door of the shrine was made with Ice Resin and a few broken jewelry bits.  I had to layer the resin on twice to get the effect I was looking for.  I backed the door with text and a layer of mica to add more interest and create dimension.


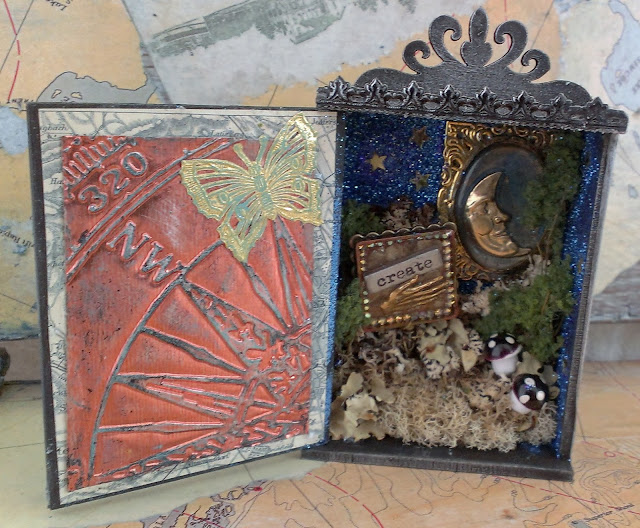
The inside of the door is backed with a map and an embossed piece of Spellbinders metal sheeting, which was aged with more gilders paste.  I chose the image of the compass because for me this represents new direction.


My focals on the inside are made from a few resin creations I made this weekend as well.  Here I have used some very fun techniques to create interesting textures in the resin.  I have embedded mica and I also used perfect pearls to color the resin.

I hope you enjoyed my little Door Shrine, stay tuned for more dimensional assemblage, I was a busy bee this weekend!

Cheers,

Rhea

Friday, August 16, 2013

Arabian Nights Shrine


What a fun theme this month at Alpha Stamps, Arabian Nights.  I love it when I have a theme in mind and then go treasure hunting at local flea markets, estate sales and antique shops and find just what I "need." 


My recent score of a small elephant for fifty cents made for a perfect springboard for this little project.  I thought it was a great place to show off these cute little treasure chest charms.


Inside I also stashed a another wooden bit from an estate sale.  It was in a bag of junk, and I think it is actually marked from Russia...but I thought it could pass with my theme in mind.  If I would have just glued the wooden building in without propping it up on a tiny bottle of glass spheres, the focal would not have as much interest, as they were both the same height.


It is difficult to see, but the back ground inside is actually flakes of purple mica.  I was a bit disappointed that the color was darker than I imagined, so it is hard to catch this cool detail.  

For a full list of all the fun Alpha Stamps treasures I used, go here.

Cheers, 

Rhea

Sunday, March 24, 2013

Tiny Geisha and Buddha Houses


These tiny houses were a total blast for an assemblage fan like me.  I was able to alter these small shrines in a very short time frame, which is rare for my mixed media pieces.  It always seems like I am waiting for glue to set!


I made the geisha house first.  Inspiration struck as I was sifting through my trusty box of Alpha Stamps images.  I was simply looking for something that was the proper scale.  When I stumbled upon this picture, my theme quickly took shape.  Check out all the goodies I used here.


To add dimension and age I mounted the picture on a domino.  I then used distress techniques to give my focal age by sanding and adding ink.  Interest was added to my brass elements as well.  I used liquid pearls and gilders paste which are some of my go to products for altering metal bits.  


The smaller of the two houses holds a tiny Buddha.  To hide the hold in the bead, a brad was glued in.  I also had to put something inside of my flower to prop my head up like I wished.  This shrine is trimmed with the tiniest of butterflies and lovely Dresden border.  You can also see that I altered my flower with copper and white gilders paste, with a little liquid pearls in the center.  


I am so enthralled with making these tiny houses that I am participating a in swap for them through Retro Cafe Art.  The deadline is not until May, so there is lots of time to play!

Cheers, 

Rhea

Sunday, February 13, 2011

Love Shrine II


Well I just could not bear to let go of my first one, so here is the replacement for my partner.  I started with the same strategy of burning the paint off of the Altoid Tin.  I recently picked up a smaller stack of paper that I would not usually graviate towards, it was filled with pinks, hearts, flowers and the like.  I embraced these shabby shades and lined the inside and cover of my tin with pieces from this stack.  The edges are covered in Tim's tissue tape and Ranger's stickels.  I also used some K Company embellishments left over from my bunny and chick chunky book pages.    


The inside also boasts tissue tape along the edges.  I can't get enough of this stuff.  That said, I do have issues with it not sticking as well as I would like sometimes, but I cure that with a dab of matte medium.  The letters and chipboard backing were scored from one of my local scrapbook haunts, Dillons in Portage, MI.  They are a lovely bunch over there and they have invited me to teach!  I am nervous, but excited at a new opportunity.


I also used a felt heart from Martha Stewart and part of a barrette that I picked up from Goodwill and tore apart.  I find neat metal bits there sometimes, in fact, that is where the bobbin came from too. A few little buttons in the corner and a die cut key from who knows where finish off round two of this project for me.  

I hope the recipient enjoys.  It is quite a departure from my usual brown and earth tones, but it is good to step our of my usual pallet.