Showing posts with label altered house. Show all posts

Sunday, June 7, 2015

House Shrine


So yesterday one of my art pals, Andy, posted a "permission slip" to go to your studio to make art on Facebook. This is the result of my play time yesterday and I am so pleased with the outcome.


The base was from the wood section of a big box craft store.  I had primed it with black gesso long ago, and today was the day that leg work paid off.  The jumping point on my basic technique was when I started to edge the house with Ultra Thick Embossing Enamel (UTEE) in bronze.  I realized that I could make the look of patina by adding in a little turquoise Iced enamels while the UTEE was still hot.


In this image you can see how I made my Tim Holtz hardware match the project with the use of Vintaj patina.  I also love the little heart embellishments.  They are made of wood and I used more Iced Enamels, this time in ivory to create some contrast.  A vellum heart cut out by Heidi Swap was layered on each heart for extra detail.


This bee bezel I made a few weekends ago found it's home along with some other metal bits and pieces from B'sue Boutiques.  Again, the use of the patina helps to bring everything together and create a cohesive look even with different metals.


As you can see I got really crazy with the UTEE.  I ended up doing the whole outside of the house with the stuff.  To add some texture I used a script stamp while the UTEE was still hot.  To blend it a bit, I used the heat gun over the stamped words to erase and blend some of the texture back. More patina was added and wiped off to make the letters pop.


My intent was to create lots of depth by having different layers of embellishments.  I mounted the focal butterfly on a box lid so it would stand out from the back.  The heart banner was made from a scrap of cardboard that was embossed and distressed.  It was a challenge to solve the bottom of my shrine, I got stuck a few times on my composition, but in the end I worked it all out!


Here you can see the inside edges just a bit.  Layers of tissue tape and stickles make for lots of texture.  Also you can see a tiny glimpse of the embossed metal that I used in the very back.

This was such a fun piece to create and share.  I hope you found some inspiration along the way!

Cheers,

Rhea

Sunday, April 21, 2013

Tiny Steampunk House


Why is it that artists are so drawn to house shapes and imagery in art?  Just like birds, this type of imagery and subject matter seems to often ripple throughout the creative world.  I cannot help but join in from time to time.


As usual, lots of metal bits have been added to the project.  Sometimes I just experiment and odd things I would not usually put together end up on a piece creating a cohesive focal, as in this case.  To see all kinds fun goodies I used check out this link for Alpha Stamps.  


The roof of the house is actually UTEE that I stamped into when it was still warm.  A rubbing of copper gilders paste brings out the texture from this technique.  I love how this element turned out.


Another trick I tried for the first time, coloring glitter.  I wanted to use a coarse grain and I did not have the proper color.  I used alcohol ink to dye it, and it worked really well.  

I really like how this tiny house turned out.  Working on a small scale can be rewarding as it can yield results quicker and I am such a hasty artist sometimes.  

Cheers, 

Rhea

Sunday, September 2, 2012

A Retro Halloween

It was almost exactly one year ago that I discovered the joy of Retro Cafe Art and their amazing Coffee Break Designs. I had gone to an art retreat in Chicago and they had a booth there.  I went nuts on all their Masonite goodies and developed quite a stash.  Recently when I saw on their Facebook page that they were having a Halloween art contest, I knew I would celebrate by using some of my coveted supplies.


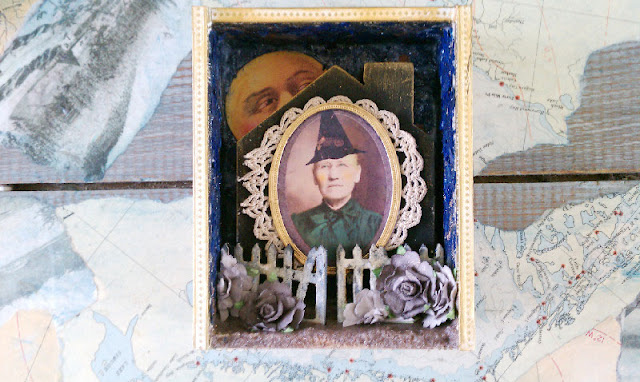
The first entry features two images from RCA's current free collage sheet.  I made the moon peek over the side of the house and I love the altered cabinet card witch.  


I used mica and glitter to line the inside of a smaller cigar box.  The sandy paste I have used in other projects. In fact, this was left over from this post.  You can hop on over there if you would like the details on how to make the paste. 


Other items used on this project from Retro Cafe Art are: picket fence cut outs (these are so handy people), guilders paste and the wonderful star washi tape.  I am a sucker for designer tapes!  The lace was actually cut from a doily and the house base was found at a rummage sale.  A fun project indeed.  

The second little assemblage I put together is also filled with RCA supplies.  I started with a three hole cubby.  This was altered with guilders paste and decorative tape.  You can also see the use of those fences again.  All of the Masonite products accept the guilders paste very well.  


I used their tiny heart shrine, two sizes of red cotton spun mushrooms as well as a Halloween paper cut out.  I was a little surprised at my Retro craft stash!  


I guess this is the official start of the holiday season in my crafty world!  Here we go!

Cheers, 

Rhea