Showing posts with label collage. Show all posts

Saturday, March 21, 2015

7 Gypsies Serengeti Receipt Holder


Today I took some time to finally play with some of my new goodies from Canvas Corp.  I created this mixed media receipt holder with the Serengeti paper as the springboard for inspiration.


In order to add a layer of texture I used a few fun things. One is resin covered tissue that has been ripped and torn.  I also used some tissue tape.  The tissue tape was added over the edges to break up the hard lines of the receipt holder.    


Yet another fun element in this project are the patches.  I added them with vintage pins in the brass color.  


I am always trying to fill in every nook and cranny.  To that end, I also added some labels that I embellished with rub ons.  


I was able to sneak in a bit of twine by attaching it to a few of the global tags.  This adds more texture and a bit of movement.  


 Lots of the mini ephemera and vintage photos were used as well. 


This project was so super fun and it really came together quick.


As I created this I thought of an old friend of mine.  She is doing everthing she can right now to find a way to volunteer in Africa to save animals, specifiacally rhinos.  I wish her the best in achieving her mighty dream!


I hope you enjoyed today's post.  As always I treasure being able to share my goods with you all.  It inspires me so!

Cheers, 

Rhea


Saturday, March 14, 2015

Tangled Journal Page


This project was completed for Canvas Corp and their recent Tangled challenge.


My focal here is from the Journey Tangled Pack and it was really easy to create.  I layered on lots of products, including some Tattered Angels S.W.A.K. mist, to give it a mixed media feel.  I was sure to add some of my own doodles and marks to make my page unique to me. 


The sentiment was taken from the new Gypsy Moments paper.  I love how the ink bled through the words making them blend into the background a little bit.


I also challenged myself to use some craft supplies that had been neglected.  It is my goal in 2015 to use up the good stuff!  To that end I used some butterfly rub ons as well as the paper flower borders which had been lying around forever.

I hope this post inspires you to use some of those old supplies as well.

Cheers,

Rhea


Saturday, March 7, 2015

Air Mail Collection Folio


This project was completely inspired by Linda Ledbetter and her amazing Curiosity Crew.  They put together such an amazing array of projects, I could not help but to play along.  


This post is super long, so I warn you in advance!  Check out the great latch I added to close this fun folio.  I have included an image here of the back so you can see what the base of the project looked like.


Here you can see the great translucency that Ice Resin gives Tim's tissue wrap.  Some of my grungy stenciling and background can be seen peeking through.


I imagine I could keep on working in this book for a long time yet! It needs some doodling and journaling.


I used lots of the new vellum ephemera from Tim Holtz.  I ran most of my stuff in this book through my Xyron sticker maker and it worked great.  You can also see above where I used eyelets to attach my book to the folio along with a bit of E6000.  The combination of a cold connection and heavy duty glue made for a perfect combo.


Note that I added some stenciling after the project was complete.  This way I added a final layer of ink on top of everything.


This week's contest for the Compendium of Curiosities is sponsored this week by Inspiration Emporium.  I have not placed an order there before, but their site looks yummy!


The vellum has such an awesome translucency, I just love it.


Home made envelopes, paper bags, tags, tissue tape and tickets are sprinkled throughout my book.


 There are things tucked inside of each little pocket and envelope too!


Some of the ephemera is simply clipped on.  I like to have the element of movement to my work.


I used lots of scraps from my resin tissue wrap in this project as well.  The round postmark from the British Post office is one example below.


I hope you enjoyed today's post! I sure had fun creating this project! Thanks to the whole crew for an amazing week of inspiration.

Cheers,

Rhea


Saturday, May 3, 2014

Spring Time Book for Alpha Stamps


I absolutely love all the new spring time goodies I got my hands on from Alpha Stamps!


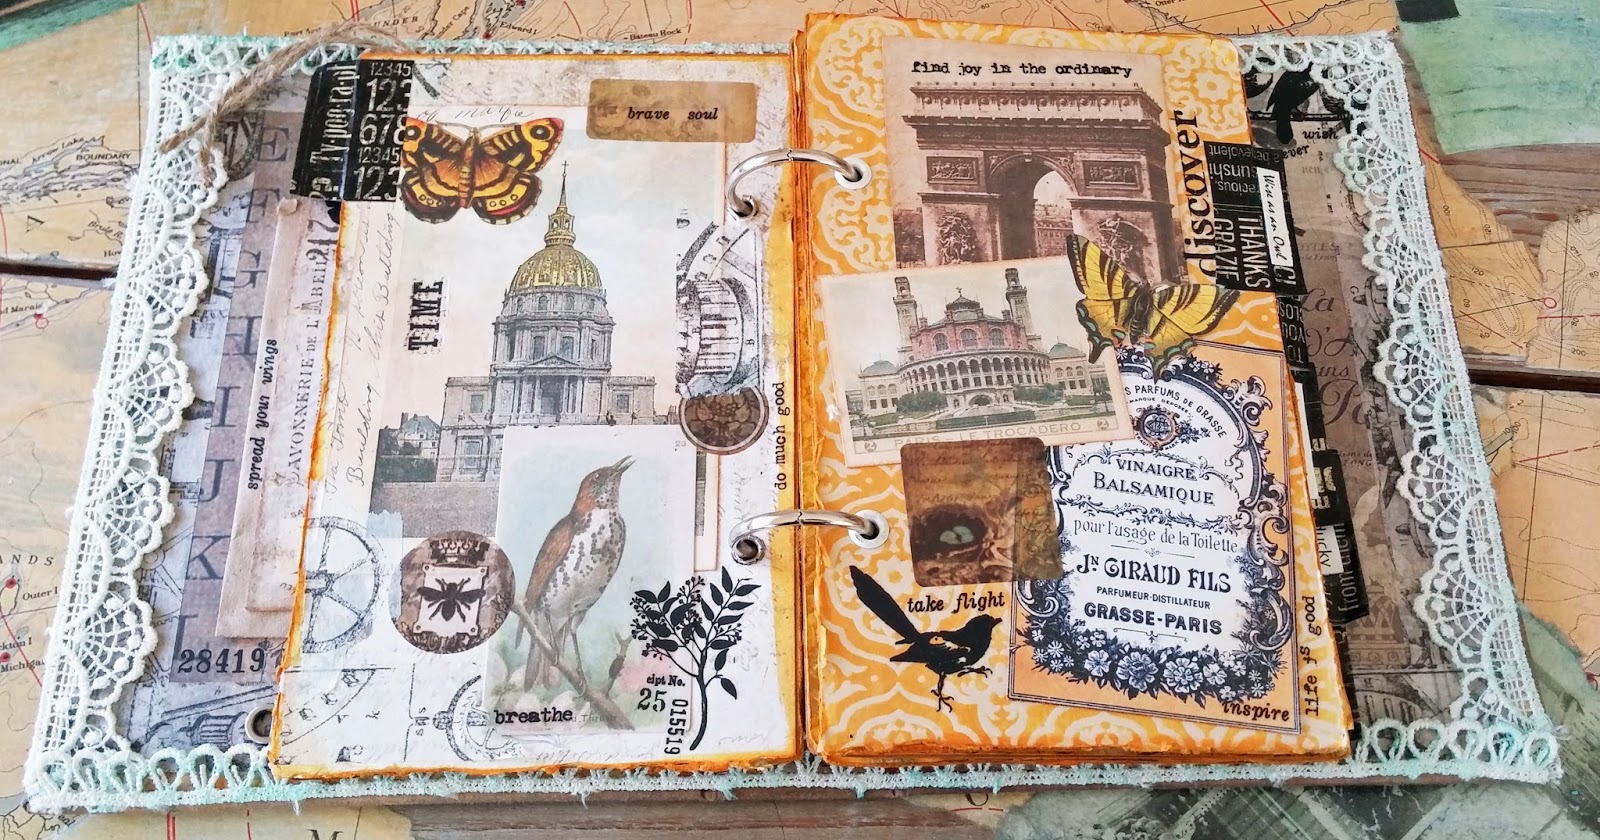
I could not wait to make this fun Spring Time in Paris Collage book.  It was so super easy with the help of my trusty goodies from Xyron.


I used a bit of Wild Honey Stain by Tim Holtz to unite the book.


To age the lovely crochet ribbon edges I actually added gilders paste to the material.  It cast a mild blue hue and I just love it.


Some of my left over Ice Resin tissue flowers ended up in my book.


The butterfly Dresden scrap made for a perfect addition.


Lots of Tim Holtz rub ons were used through out the project.  My secret is to try to use up the whole sheet so I don't have left overs.  That way I keep layering and layering them in as well.


The Tim Holtz ephemera made for great embellishments along with collage images from Alpha Stamps.


Cheers,

Rhea

Saturday, April 12, 2014

By the Sea Book Box


I have been dying to make one of the new smaller Tim Holtz Configuration books since they came out, so when Leslie at Alpha Stamps asked me to create one, I jumped at the chance.  

Here is a rather juicy list of supplies from Alpha Stamps.   


For the theme I decided to go with By the Sea by Graphic 45.  I had so many trinkets to fit this theme, which lead me to my choice.


My favorite things about this substrate is that you can combine collage, bookmaking and assemblage all in one.


Inside I used sand mixed with matte medium to create a sandy scape.  In order to add a bit of flash and sparkle I also added some mica flakes when it was still wet.


The inside cover is collaged with lots of goodies. I used my Xyron to ensure that each bit is covered in adhesive.


I love the beads I just happend to find right before making this, I thougth they looked like little sea urchins.


I also used a few weird treasures that have been in my stash for ages, like that rubber seagull.  He is pretty beat up and I have no idea where he came from, probably a box of junk from my dad.


Here is a close up inside another box.  Lots of layers for interest gives the eyes places to wander!

Cheers,

Rhea


Friday, November 1, 2013

Handmade Holidays Blog Hop


I am so very pleased to get to participate in the Third Annual Handmade Holidays blog hop through Graphic 45.


This is a three day event filled with amazing talent from the best crafters and designers in the industry.  We have all come together to share a series of handmade gifts for the holidays with the hope to inspire you to create something from the heart this winter season.  We also intend to show how to use products in innovative ways. I hope my offerings are up to par!


I could not help but showcase my favorite medium, assemblage.  I had a table full of scraps from another project, which is what triggered this small thoughtful collage quote box.

Supplies:

7 Gypsies Solo Shadowbox Tray
gilders paste; silver and black
Distress Stain: Black Soot
Petaloo Flowers
chipboard
Industrial Chic Charms (pencil, wheel)
large domino/Scrabble tiles
Found objects: thimble, typewriter parts, metal jack, watch part vial
Strong adhesive


The project I am sharing with you today is a sentimental quote box made with Typography paper from Graphic 45.  To start off, I used my go to art item for altering paper, metal and wood: gilders paste.  I simply apply with my finger and buff all along the edges.  I do not mind getting messy, but if you do, a soft cloth or rag will do the trick.


Then, to add interest to the sides of the quote box, I applied tissue tape.  I wanted this to act as "noise" or pattern along the inside edge.  To push it back a bit, I added another layer of gilders paste over the tape. Notice my work is not perfect, sometimes you just have to embrace imperfection.  I will also strategically place my objects so that it covers any unsightly sloppy spot.


To make my quote stand out with dimension, I backed the paper on heavy chip board.  Please note, this project would work well with a photograph in place of the quote if that is more your style!  I tried to pull in some holiday hues, while still creating a project a friend could display year round.


The edges of the statement were coated with black stain and more gilders paste.


Now it is time to add the background layer of papers for your box.  I chose coordinating patterns with a holiday palate in mind.


To make my image stand out I hot glued an old domino in my box for dimension.  You can also use foam or any other object you have on hand.  Use what you have!


Here you can see my focal has now been affixed.  I was on a hot glue kick, which is great for speed, but it is not always the most steadfast adhesive.


I then started to plan out my little cubbies at the bottom.  I chose to use a few treasures I had on hand that went with the theme.


In the smaller bottom compartments,  I used old Scrabble tiles to pop out my statements.


Continue to add elements, being mindful to balance your composition.  Use odd numbers of objects and be sure to have different heights, depths and placement.


If your embellishments don't match your color palate, a little bit of gilders paste can solve that quandary.  I actually ended up only using half of this clothespin because it would not lay flat in my tray.  The spring was allocated to another cubby and I saved the other side for a future project.


Keep on adding elements until your feel your piece is finished.  I chose to add some flowers from Petaloo, customizing them by adding a few bits of the Typography Chipboard.


Another Ornate Metal Key gets dusted with gilders paste so that it matches the festive palate.


I love that I was able to locate one of my vintage typewriter keys to match the saying "A stitch in time, saves nine."


It is hard to tell, but inside the tiny bottle is the definition of the word "friend."


I hope you enjoyed seeing how easy it is to make a memorable collage as a holiday gift.  Please follow along to the other blogs below to see a ton more holiday gifting inspiration!  P.S.  There are prizes to be had so please comment below!


Eileen Hull Designa  Sizzix 
 Mistra Hoolahan Donna Salazar Designs 
 Elise Durneburger 100 Proof Press 
Lexi Grenzer Ice Resin
Graphic 45 Rhea Freitag *** You are Here
Debbie Cole Clearsnap
Vickie O'Dell  Smoothfoam
Teresa Abajo 100 Proof Press 
Amy Bowerman Sizzix
Jo Deserio Jones Ice Resin 
Lisa Fulmer Smoothfoam 


Cheers,

Rhea

a Rafflecopter giveaway