
I have seen a few examples of what can be achieved with this paper, so I knew I wanted to incorporate wrinkling the paper. I decided to use one of the first altered techniques I learned and make faux leather. You can do this application with a heavy paper bag instead of the glassine paper if you don't have it on hand.*
Here goes my first stab at a tutorial, please excuse my messy crafting area and simple photos. I think I may need a tripod and better lighting!
Timspired Faux Leather
Supplies:
Kraft Glassine paper*
Grungeboard
Distress Inks
Spray bottle filled with water
Yes Paste
Semi Gloss Medium
Paint Brushes
Edge Distresser
Brayer
I started by crumpling up the glassine paper and spritzing it to soften it a bit.

I then did a direct application of Distress Inks.

I used rusty hinge, wild honey and vintage photo. I spritzed with water to get the inks to activate and bleed into the wrinkles of the paper.

You can play at this stage for a bit until you are satisfied. Please note if you are using a paper bag it will get quite fragile and rip if you are not careful. I had no issues with Tim's special paper. Your hands will get really inky, beware! I avoided using a heat gun with the Kraft paper, as I did not want to activate the wax coating. If using a paper bag, let dry or use a heat gun before the next step.

Now add a couple of rather thick coats of gel medium. I typically wait a bit in between coats and put them on in opposite directions. Three coats seems to work well for me.
This is when I had my epiphany to add this to grungeboard to increase the leather like quality of the project! What do you know, Tim made each supply in the very same dimensions...

Now, on my first page I attempted to glue the layers with gel medium, that did not work. The grungeboard seems to be very thirsty as I think it absorbs the medium. I stepped it up with Yes Paste and that worked great.

I used a brayer to smooth it out. Be sure to get your edges really good.

I then added a sheet of paper to the back and distressed the edges.

Last, I applied ink to the distressed edges.
When your done you have a fab piece of faux leather that really bends and moves. I think the possibilities for this altered Kraftboard are amazing!
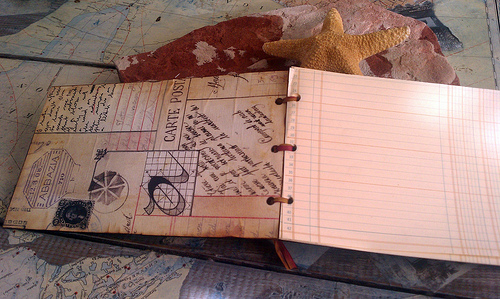
For the book, I simply made two pieces of leather Kraftboard, lined with pretty paper and cut up some vintage ledger paper for the inside. I punched holes with my Cinch and tied to bind with silk ribbon I hand dyed. The bookplate is by Tim as is the Journey stamp. I did a really neat trick of sandwiching my floating ledger paper "journey" in between two pieces of acetate packaging.
I hope this entry finds you well and inspires you do do something new! I can't wait to try this with the grungeboard with dots on it, I think I can create a faux ostrich leather....
Cheers,
Rhea
Awesome technique!! I'll definitely give this a try. Oh, and you call that messy? Hahahaha! You need to come to my studio. ;-)
ReplyDeleteWhat a great idea. Mikila
ReplyDeleteSpectacular. Just waiting for the glassine to come in my next order and I will try this. Thanks for sharing.
ReplyDeleteThis reminds me of a project I did with my son's class when he was in 4th grade for Frontier Day. It was a picture frame starting with a crinkled paper bag and modepodge with his photo in his cowboy outfit inserted inside the hole. It was xed out and folded back over a cardboard square with the center cut out.He's now 25 but I still have it.
ReplyDeleteGreat technique! TFS!
ReplyDeleteCool technique! I believe I have everything but the Yes Paste, so I'm on a mission now...
ReplyDeleteThis is such a cool technique!
ReplyDeleteThanks for entering my giveaway and best of luck
hugs Lynn
Hello Rhea,
ReplyDeletethanks for sharing this technique ! I love the look of leather on a book.
I don't have the glassine paper, but I make my own with brown paper bags and wax.
You are right by adding the gelmedium to enhance the leather feel. I did this on painted bookbindinglinnen and it really comes out like leather !
I like that you added old paper to your book . This makes it a really vintage old book, just like you found it in one or another old library !
greetings from belgium
Inge
Beautiful faux leather and very well written and illustrated tutorial. You've made a lovely journal.
ReplyDeleteThank you for the tutorial and photos! I am trying it as I type, lol!
ReplyDeleteYou would never know this was your first tutorial...this is fantastic! Thanks for sharing...love your creation!
ReplyDeleteThat's a fabulous look: Well done!
ReplyDeleteRhea, I took a glass with a Ranger Certified instructor and we did this with Grungepaper, so that works too. Yours is beautiful too! I love the whole book. What a great place to record your thoughts!
ReplyDeleteI just want to say a HUGE thank you for this tutorial, I was really striggling to come up with an idea for a guest book at my Phantom of the Opera wedding and this is so utterly perfect!!! xx
ReplyDelete