Showing posts with label 7 gypsies letterblock tray. Show all posts

Saturday, April 25, 2015

American Vintage Assemblage


I was inspired to create this project as soon as I saw the new American Vintage paper line come out from 7 Gypsies.  I slowly began to gather found objects as well as my coveted 7 Gypsies metal elements that I knew would complement the theme in order to create this fun vintage letterblock tray.


It takes some patience to make a project with this many elements, the key is to be patient and do it in stages.  Sometimes walking away from the project to let glue dry will allow you to come back and see the whole things with fresh eyes. I find this tactic really helps me to fill in every inch of my art, which contributes to my own personal style.  After coming back to my work a niche will be calling out for extra junk and the search will then start for another element to add.


When I make these assemblage style trays, I try to attach things at many different layers of depth.  In this project I used some scrap cardboard to prop up some of my ephemera and make it stand out.


Another little secret I will share is to mist your project with a sheer Tattered Angels Glimmer Mist at the end to cover up any glue that may have escaped. This trick will not totally cover the glue, but it will distract from it at least a little bit.


I mixed in lots of great elements from the 7 Gypsies line along with my own found elements and treasures to pull this piece off.  I love how the old and the new blend seamlessly together. It is fun to root through your junk drawers and your craft stash to come up with fun personal things to add to your tray. Another great idea would be to plan to make one of these before a road trip and then purposefully seek out your own pressed pennies, ticket stubs and ephemera to capture a memory in a whole new way!


You may have noticed that the base of my tray has been altered a little bit as well.  I used a scrap of paper towel to buff on a layer of patina colored gilders paste to add a weathered look to the wood.


I hope that this post has inspired to go through your trinkets and create a letterblock tray that captures a special trip or memory!

***This post was also featured here!***

Cheers, 

Rhea

Wednesday, November 12, 2014

Come Away with Me Printer Tray


Oh how I love to create these printer trays!  This one was made for Graphic 45 with their Come Away with Me paper line.  The palate of this paper collection is really lovely.  


Within each cubby I used lots of the coordinating chipboard and stickers.  The product line mades it so easy to be able to complete one of these.


Lots of travel themed charms were added as well to add interest and flare to each little spot.


I think that one of the reasons I like to make these is that there is always so much to look at.  


Another way that I added interest was through the use of paper flowers as well as ribbons on the small tags.  


You can see here that I also used my favorite, gilders paste, to alter the wood.  The edges were trimmed with lace in order to change up the look a bit.  I have made so many of these!


Thank you so much for taking the time to check out this post!  

Cheers, 

Rhea


Monday, January 20, 2014

Couture Letterbox Tray


Today I decided to celebrate my day off with an art project done just for me.  It has been ages since I have made art not intended for one of my design teams, and I have to say the project came together effortlessly.


I embraced the full color palate of the Couture paper line by Graphic 45.  It has some really lovely sentiments and messages that are good reminders as I am taking better care of my physical body.  Hopefully soon the efforts will be able to be seen in my own new style.  It is coming this year: 40...and I hope to be fabulous and not that other f word.


This "couture" stand is made from an old sewing machine part and a piece of Graphic 45 chipboard.  I just love using unique things in my stash to make a project have my own individual flair.


In the "classy" box above I used an old shoe clip to back the card stock sticker.  This made for great texture and added another great fashion themed embellishment.


I added a precious typewriter key along with a few black vintage snaps I had in my stash.  Again, the snaps made for a great re-purposed decoration in this assemblage.


In this cubby I added a bezel from Spellbinders I filled with Ice Resin.  I stuck this word right on top of the saying "Isn't she lovely."  It is a good secret reminder for me to remember and believe that sentiment.  A vintage button, a few more snaps and one of the great new shabby chic staples finished out this section of the piece.


More reminders to accept myself and remember by beauty.


I thought the crown was fitting for this saying from Coco Chanel.


To finish out my tray, I peppered in lots of color with a few bunches of paper flowers.  I think this element really makes the piece pop and gives the eyes places to wander. 

Thank you so much for stopping by.  It was so much fun to create something just for me!

Cheers,

Rhea

Saturday, July 14, 2012

Layers of good junk

This assemblage has been in the works in my mind for quite some time.  Not too long ago I won a really amazing giveaway from one of my online crafty gals, Zoe.  We have been swapping for a while, she sends the most amazing packages.  Her attention to detail is simply amazing.  Anyway, I won a lot of "vintage" Tim Holtz papers and goodies. I knew I had to do something neat with the paper as it is no longer around.  A letterpress tray from 7 gypsies made for the perfect homage.


I tapped into some things I have been holding onto for a while.  Sometimes it is so hard to use up some of those special trinkets.


A few of those hard to use pieces were from a typewriter I tore apart.  It took me so long, but I was able to harvest some really neat stuff from it.  I also added an old grocery store price tag, a random game piece and an old piece of hardware.  The clock images throughout were cut from really neat paper from a book making store.  


The small amber bottle is filled with a few of the screws left over from the typewriter tear down.  I have loads of respect for the craftsmanship that went into making this device.  The pendulum is a hand off from my Dad, he deals in antiques and once in a while he is generous with the junk he can't make money on.


In the picture above you can see a bit more of the collaging I did before layering in my junk.  I used light bulb cut outs from Retro Cafe Art, a wonderful vendor.  Also to add more layers I used images from Alpha Stamps.


The ruler is a color copy of a ruler I found at an estate sale.  As I live in Kalamazoo, this was a score.  I made several copies of a few rulers to create my own personal scrapbook paper.  You can also see an old pencil I tucked up in the corner as well as another really cool typewriter part.


Here you can see that I actually attached the hardware hook to the printer tray structure.  I used a few more bits of tiny junk in the upper sections.  This time around I tried to edit a bit.  I tend to over do it with too many layers of junk.   

Speaking of layers, this is the theme for this week's challenge over at Simon Says Stamp and Show so I am adding this piece to the mix.  I recently applied to be on their design team, but I was rejected once again. I was beyond disappointed, but there is always next time I suppose!

Cheers, 

Rhea 


Saturday, April 7, 2012

My Olde Curiosity Shoppe

I am so happy with my latest project.  The new line Graphic 45 recently released, Olde Curiosity Shoppe, is simply amazing.  I have had my stack for a while and yes, I had to talk myself into cutting it. 


The tray was picked up at my not so local crafty outlet store. I love, love, love this place and usually make the hour trip about once per month.  I would be in trouble if it were closer.    I paid about five bucks for the tray because there were a few scratches on it. 


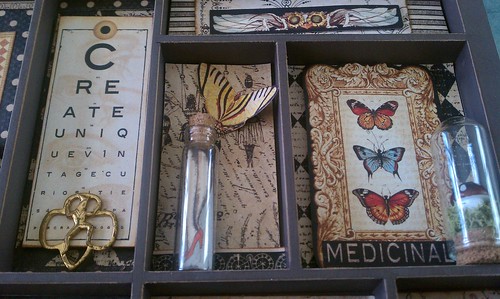
I am not sure where I found it, but the button is a treasure.  It is from the Detroit Police, close to where I grew up.  In order to add texture moss was added. It makes for a nice curious bit for my tiny shoppe.  In order to achieve more dimension I layered paper and also used tall glue dots to raise some of the imagery from the back of the tray.   Some of the butterflies are also popped off the page for interest. 


Here is a bit more moss too.  I kind of went with a flora and fauna idea when searching for my curiosities.  I had some shells out on my work table and thought they were a fun addition to my assemblage. Lots of distress stain was also used to make my edges finished and old looking.  I cannot live without this stuff.   


I could not resist adding a tiny gadget, otherwise known as a watch movement.  Who would have thought I could include nature and industry in one piece and have it actually look cohesive?  Thanks to Graphic 45 for that one!


Lots more metal goodness here.  I aged some of my new stuff to make it look old.  I rusted the pen nib as well as the clock charm.  The tiny clock key was altered a bit with some black acrylic paint.  I was not even searching for that little doodad, but knew when I stumbled upon it that it had to go in this piece.  The old watch spring was crammed into a tiny bottle alone with another coil of wire. 


More fun stuff in these little areas too.  The paper had a nice image of the women's legs in a bottle.  I cut off the bottle off the image and used their idea by adding it to my own little bottle.  This was the perfect project to add another one of my little apothecary domes with a mushroom inside.  So super fun and cute.  I thought  the Girl Scout pin was another unique addition. 


I have been hanging on to this large clock key for a long time.  It was a score from my dad.  He has the best stuff and once in a while I get to partake.  This project is the perfect place to display it.  The flakes inside of the jar are burnished mica flakes and they are available at Alpha Stamps.  They also have all this wonderful paper over there and apothecary domes too.  Yes, they are my favorite shop due to my wonderful new Design Team appointment. Their shop is worth exploring!


 Another clever trick.  I mounted some left over eggs I had right to my shrine.  I love how this mimics some of the imagery in this paper line.  Most of the trinkets in this project are simply held with matte medium.  It pretty much just disappears.


To finish the tray I added the last of Tim Holtz's box corners.  I am sad my supply is diminished, these are good staples to have in your stash.

I hope you enjoyed browsing my own little Shoppe of Curiosities.  It sure was fun to assemble.  Since assemblage is one of Wendy Vecchi's styles, I am also entering this into Simon Says Stamp and Show's weekly challenge.

Cheers,

Rhea