Saturday, July 21, 2012

Steampunk Box

This box was so fun to make!  I actually wrote a tutorial on how to make this here.


I just love using guilders paste to alter metal.  I am super excited as I just brought my beloved paste in white.  I can hardly wait to get crafting with it.


Since the theme this week over at Simon Says Stamp and Show is no rules, it seems this project is a perfect fit!  


I am using my box to store some fun altered coasters.  I participated in a swap for these with Alpha Stamps so I plan to use this to store my happy return. 

Cheers, 

Rhea

Embossed Metal Box Tutorial

In this project I will show you how to take this humble little box from Alpha Stamps, and turn it into a grungy but elegant steampunk box.  This was also the technique used in my Altered Dress Form, posted a few weeks ago.  I am happy to report that this dress form was chosen to go on tour with an expo show for the next year.


Chunky Book Box


Here is a peek at the finished product. This box is 4x4 so it is perfect for small chunky books, altered coasters or just random junk.  


I started out by prepping the box feet with both black and patina guilder's paste.


Then I moved on to prepping my box.  I applied one thick coat of black gesso.  


While these dried, I worked on embossing my aluminum tape from the hardware store.  Now, I do happen to have a machine that I use along with embossing folders.  If you do not have this resource get creative.  I was able to sample some textures from around the house.  A beaded place mat, a wire basket, a heat vent...get creative!


To add more dimension and texture, I painted my embossed tape with gesso and then wiped it off.  This leaves a bit of color in some of the indentations of the foil.  It also dulled down the metal quite a bit.   


Now for the fun part, applying the tape.  This is so easy, since the adhesive is already there.  I layered three strips on the top, adding each of the outside layers before placing the one in the middle. 


A bit of tissue tape on the edges gives it a finished look.  To blend the tape in with the project, I wiped some black gesso on and then off of the tape to grunge it up.  I also added a bit of spray glimmer to shine it up with another layer of texture.


Now it is time to add the hardware.  I simply used a heavy duty glue for the feet.  Make sure they are all level as it dries!  A vintage clock gear is held on by the faucet handle, which was screwed onto the top of the box.  Be sure to do this before embellishing the inside and the backing of the handle will be hidden. 


Now I chose my wonderful Alpha Stamps imagery.  The round things collage sheet had many options, so I chose a few.  A few large spinners add my favorite element of movement to the project.  


Simply glue inside with a bit of coordinating paper, and you are done.  


Hard to believe this was a simple little gift box to start, eh? :)


I hope I have inspired you to step outside the box with your embossing.

Cheers, 

Rhea


Sunday, July 15, 2012

Alpha Stamps Gypsy Fever Blog Hop!

It is time for another really fun blog hop with Alpha Stamps.  This time there is a bit of a challenge, but it is worth investigating, because there is a $100 prize to be had.  To enter, simply find the secret words in our posts, unscramble the saying and leave the answer as a comment on the AS blog!  Correct answers that have been posted on the AS blog will be entered for the chance to win the prize!

I have been so excited to show off this project to all of you, as it has been in the works for a while!  Be warned, there are lots of pictures in this post.  I designed this little gypsy caravan for Alpha Stamps, as they are hosting a gypsy swap.  I had so much fun with this theme, I just may have to join in the fun.


I had some challenges with my little bottle cap wheels.  It seems my first choices in glue were poor, so my first photo session was an absolute disaster.  The wheels were popping off left and right!    


I like how the book rings look like big hoops a gypsy just might wear.  The cool thing is I could add more cars to my caravan if I choose too or I could split them up.  


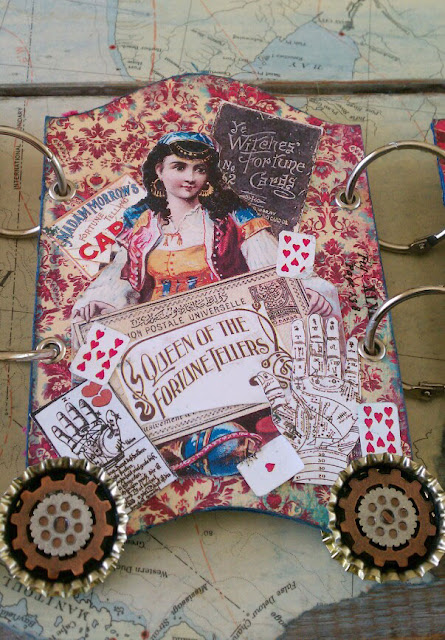
First we shall take a peek inside and see what these gypsy folk are up to.  I loved the imagery used here.  Alpha Stamps has a lovely selection of imagery in this theme.  As always, there is a sale that goes with the current swap to sweeten the deal.   


The central image above was black and white, which would not work in my project.  To solve this, I simply used colored pencils to color it in a palate that worked for me.  I love the new beaded trim Alpha Stamps now has, very fun.


Each of the wheels of the caravan are simply bottle caps painted with gesso on the inside and then two layers of gears.  I was able to mix and match my gears to create a number of different wheel styles.  This proved to be problematic, as when I had my wheel issue, I did not pay attention when reattaching them and made some matching errors. All is well now!  


One thing that really made this project easy was the wonderful Gypsy Sister paper from Alpha Stamps  which was used as a background on all of my caravan. I absolutely fell in love this paper and I so wish I had gotten the whole stack!  I call a sell out on this item for sure.  


The rich colors of this paper works well with the theme, but it is typically not a palate I usually gravitate towards.  I am slowly starting to embrace colors beyond vintage brown!!!


Now we can take a peek to see how the "back" of my pages turned out.  I tried to make them look like the outside of a caravan.  As I researched caravans on the Internet with good old Google, I noticed that they often were brightly colored, had flowers or plants and they were very ornate.  


Resin windows got an aged finish with my favorite...Guilders Paste


Here a gypsy peers from behind a gilded window.


It is hard to tell, but on this car I used a spray ink and a stencil to add some texture as the paper was a bit plain.


And here is the caboose, so to speak.  A bit of filigree and a cool key hole finish off the last of my cars, at least for now.  My favorite, Dresden scrap borders, also add a bit of ornate detail to this car.  


I hope this project inspires those of you who are considering joining in the fun swap.  It was a blast to create, and I had so much fun showing it off to you. 

Be sure to check out the rest of the hop as there is a prize to be had, if you can crack the code and find the fortune!

Cheers, 

Rhea

Saturday, July 14, 2012

Layers of good junk

This assemblage has been in the works in my mind for quite some time.  Not too long ago I won a really amazing giveaway from one of my online crafty gals, Zoe.  We have been swapping for a while, she sends the most amazing packages.  Her attention to detail is simply amazing.  Anyway, I won a lot of "vintage" Tim Holtz papers and goodies. I knew I had to do something neat with the paper as it is no longer around.  A letterpress tray from 7 gypsies made for the perfect homage.


I tapped into some things I have been holding onto for a while.  Sometimes it is so hard to use up some of those special trinkets.


A few of those hard to use pieces were from a typewriter I tore apart.  It took me so long, but I was able to harvest some really neat stuff from it.  I also added an old grocery store price tag, a random game piece and an old piece of hardware.  The clock images throughout were cut from really neat paper from a book making store.  


The small amber bottle is filled with a few of the screws left over from the typewriter tear down.  I have loads of respect for the craftsmanship that went into making this device.  The pendulum is a hand off from my Dad, he deals in antiques and once in a while he is generous with the junk he can't make money on.


In the picture above you can see a bit more of the collaging I did before layering in my junk.  I used light bulb cut outs from Retro Cafe Art, a wonderful vendor.  Also to add more layers I used images from Alpha Stamps.


The ruler is a color copy of a ruler I found at an estate sale.  As I live in Kalamazoo, this was a score.  I made several copies of a few rulers to create my own personal scrapbook paper.  You can also see an old pencil I tucked up in the corner as well as another really cool typewriter part.


Here you can see that I actually attached the hardware hook to the printer tray structure.  I used a few more bits of tiny junk in the upper sections.  This time around I tried to edit a bit.  I tend to over do it with too many layers of junk.   

Speaking of layers, this is the theme for this week's challenge over at Simon Says Stamp and Show so I am adding this piece to the mix.  I recently applied to be on their design team, but I was rejected once again. I was beyond disappointed, but there is always next time I suppose!

Cheers, 

Rhea 


Tuesday, July 10, 2012

Magic from Pixie Hill

It is confirmed! I have been visited by a boatload of official Pixie Hill inhabitants and magic is afoot indeed.  One of my amazing design team colleagues sent me a lovely parcel of goodies, just for trying out her techniques.

Some of you who follow along may recall my turn down the paperclay path as documented here.  Now I had fun, and I even made a few cute items...but nothing like the work that they were inspired by.  Here is the entire lot.  Lots of this is available in her Etsy store right now!


My favorite, hands down this little trio of amazingness.  So super cute.


This little vignette is darling as well.  I wonder if she sent me what appears to be a rhea bird stamp on purpose? :)  The little fabric book is simple and precious.


All these cards are marvelous.  I can't wait to send one or two off to some artsy pals.  The gal kicking her leg in the corner is staying with me though!


There was even a print in the mix, with toadstools too. I just adore that she uses all those red and white mushies!


Nichola Battilana, you are so very special.  I appreciate your giving nature, your whimsical inspiration and magic that you create. Your parcel arrived today after a most harrowing day, and you just don't even know how much it touched me.  Thank you so very much!

I am so very blessed and honored to have connected with all of you on the AS team!

Cheers,

Rhea

Saturday, July 7, 2012

Wish You Were Here!

Recently Alpha Stamps hosted an altered postcard swap through their Yahoo group.  The theme was "Wish you were here" and participants decorated Kraft postcards to swap with other artists from all over.  I was still 'getting my feet wet' as a designer on the team, so I did not partake in the swap, but boy did I miss out.  I am writing today to feature just a few of the participants.


Sandy Alsfasser


Lisa Robinson


Beth Powel


Ann Norviel


It is so cool to see this theme interpreted in so many different ways.  I also love checking out all the different techniques that people use to make their pieces, so very inspiring.  Great job ladies!


Cheers, 

Rhea

Friday, July 6, 2012

The bead soup is simmering

I am happy to report that my bead soup has arrived and I am totally up for another challenge.  My partner, Tanya Wiles at Tenebrous Hollow Studio, is a fiber artist and she makes some really interesting pieces.  She also hand forged the tiny little clasp!  The focal is really unique and I have never worked with anything quite like it.  This should be an adventure once again. 


Here is another shot after I stirred my soup.  Look at all that handy work in the flower, really neat. There are so many interesting little bits and pieces, an idea is beginning to brew...  If you have no idea what this event is all about, please hop on over to Lori's blog and read all about the fun.   


Now that Tanya has her parcel, here is a picture of what I sent to her.  I can't wait to see what she comes up with, and the blog hop is always fun. 


The reveal date for my group is August 11, so be sure to come back and check out the results of this fabulous exchange.

Cheers,

Rhea

Wednesday, July 4, 2012

Gypsy Charm

I was absolutely thrilled to tap into my jewelry making roots when I came up with this project for Alpha Stamps.  In my opinion jewelry is really like assemblage, so I think that is why I like both of those genres of art so much.  The gypsy theme opened up so many possibilities as far as charm elements.  Hearts, birds, celestial, religious, nature, coins, really anything can fit into the traveler theme.  I made lots of bead dangles as well to fill out this piece and add color. 


I used lots of guilders paste to unite the different finishes of the charms.  I wish I had guilders paste in every color offered.  Right now I am making do with copper, black and patina. Liver of Sulfur was also used to age some of the raw brass.  It is a smelly process, but the outcome is grand. 


I used lots and lots of charms from Alpha Stamps.  They are actually on sale for a few days in honor of my little creation, how cool is that.  There are also free gifts to be had with your order until supplies run out, so check it out here.


There is more gypsy art coming soon so be sure to follow along for lots of enchanting projects.

Cheers,

Rhea