Showing posts with label shells. Show all posts

Sunday, June 8, 2014

By the Sea Beach House


Today I have a sweet little beach house made for Xyron,  With the use of my handy 5" Creative Station and my 1.5" Sticker Maker I was able to put this together in no time.


To start I edged the little house shape with tissue tape.  I love how it is a perfect fit!


I added a few layers of By the Sea paper from Graphic 45.  To add a bit of personal meaning, I wrote in a few of my dreams in between the layers of paper.  Giving special meaning to projects makes my inner artist smile.


For each layer of paper I used my Xyron sticker makers.  I love how the adhesive covers all the way to the edges and has no dry time!


Finally I finished off my fun house with some brass charms and bits from my stash.  Looking forward to a fun summer by the water, can you tell!?!

Cheers,

Rhea

Wednesday, February 5, 2014

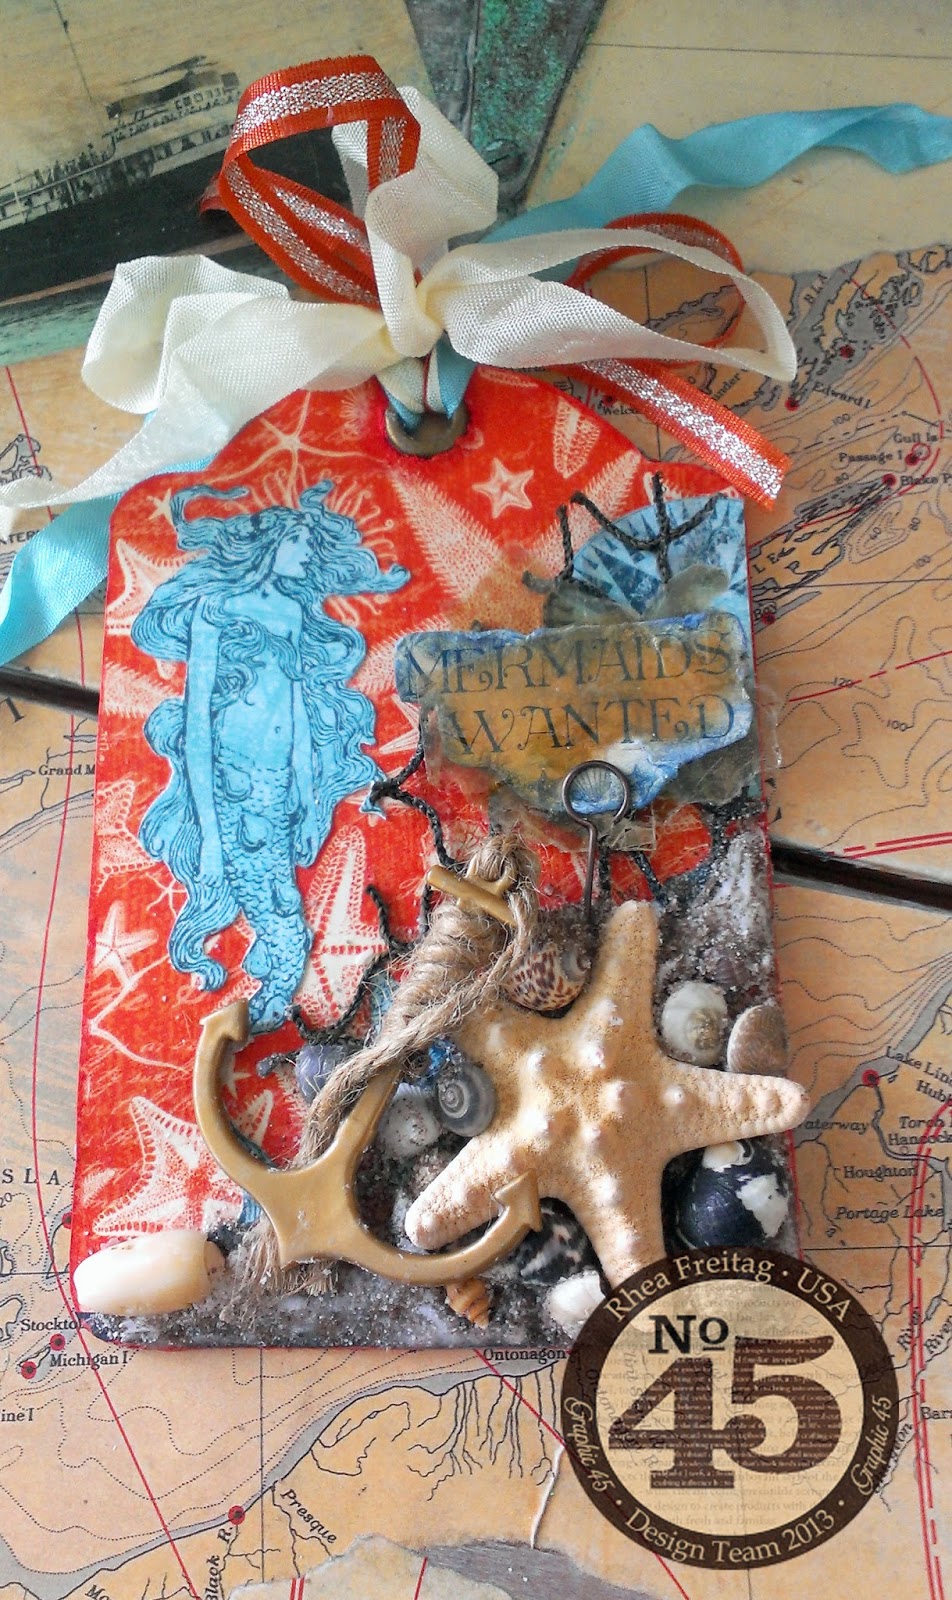
Mermaids Wanted


Since I absolutely adore mermaids I knew I had to make this image the focal of my first project with this lovely new paper, By the Sea for Graphic 45.  


I chose a contrasting background that would make the blue imagery of the “My Anchor” sheet pop.  Once I glued down the background and my layered images, I decided to get fun with some ocean themed stuff I had around the house.  I started by gluing down the starfish with matte medium.  At this time I also layered in some netting that went with the aquatic theme.  Then I got crazy with the shells, layering and layering.  


Finally I dusted it with sand, even adding some matte medium in areas to build up my drifts.  I love how the sand added texture.  


The “mermaid wanted” sign is sandwiched in between two sheets of mica to give it a reflective quality.  I finished off the piece with a plastic anchor that I think was intended for a fish tank.  I find lots of cool stuff at garage sales.   


I hope you are now inspired to add a bit of mixed media collage to your next project!  

Cheers!

Saturday, December 8, 2012

12 Days of Christmas: Nine Nymphs


My 12 Days of Christmas assignment from Alpha Stamps was the number nine, which traditionally is nine ladies dancing.  With a goal of using alliteration in my subject matter I chose to reinterpret my day and take my readers to a different place.  To keep a touch of winter in the piece I picked an icy palate, using lots of different layers of products to achieve various textures.  I will share a few tips and tricks with you in my post today.


I knew that this 8 x 8 Wooden Shadowbox and insert  were destined for this project, with nine perfect circles to showcase my ocean inspired imagery.  I had originally envisioned trying to make each of the openings into a porthole with washers or clay or something, but that thought never took shape.  Instead, I used layers of mica over my images, lending an underwater quality to my little harem of nymphs.


The outside of the box was treated with several layers of Gilders Paste in copper, white and patina.  I also used it on the display corners.  


Here is a close up where you can see a bit of the textures I achieved.  On the central background I started with a layer of stickels glitter glue.  Then, once dry, I used Picket Fence Distress Stain.  Now that dulled down the glitter quite a bit, but made for great texture.  To recapture a bit more glam, I added yet another layer of stickels in yet another icy color.  Also note all the wonderful mica flakes along the outside.  


My little drifts of mica were made by creating a paste.  I mixed my mica flakes directly into fluid matte medium and then piled it on the piece in selected areas with a small wooden stick.  Then follow with another pinch of flakes, sprinkling them over your paste mixture to get an extra layer of shimmer.


I used a large piece of mica tile that was cut to fit my openings.  I simply peeled it apart until I had my nine panels.  I used a touch of matte medium to glue these down.  I love how it kind of distorts the image and gives it such depth.  More stickles were added to act as grout, and fill in the area not covered by the mica.


To add to my icy ocean scene I used blue and white floral embellishments.  I especially like the new acrylic sprays.


I hope you enjoyed my take on day nine!

Cheers,

Rhea

Saturday, May 12, 2012

Sea Shrine Tutorial

As many of you know assemblage work is a genre that I love.  It takes patience as there are often many steps to prepping pieces but this is what really gives a project character.  I will provide a loose guide and some key thoughts while showing a few specific techniques in making this lovely little Sea Shrine I created from my very first design team kit from Alpha Stamps.


Here is what I started off with, a small 6x6 shadowbox I had in my stash.  It looks quite like a small dresser drawer.  I love that it is real wood, so it accepted several mediums quite well as you will see.


Start by distressing your shadowbox somehow.  I chose to add several (3) coats of Picket Fence stain along with Guilders Paste rubbed along the edges and on the hardware.  The inside of my box was painted with a pearl color acrylic paint and then spritzed with some light blue shimmery ink sprays (not pictured).  I typically strive to do two or three techniques to give elements of my project depth.


Once I was satisfied with my base, I planned for my focal.  I was immediately attracted to sea shore collage sheet from Alpha Stamps.  The focal image of choice was glued on to another piece of card stock before fussy cutting to add a bit of strength.


I had the idea to cut away the shell image and dig into my stash for a real one.  Then I raided my beads and found some vintage pearls, added in some tiny real seashells as well as some tiny glass spheres.  E6000 was the glue of choice here as the stuff I was gluing was "chunky."  I like to use that  in this instance as it does set up fairly quickly.  Matte medium and Glossy Accents are also good go to adhesives for the assemblage artist.


Set your focal aside to dry for a bit and plan for assembly, I love this stage.  I wanted my shell focal piece to be in a bank of sand.  To this end I used a bit of paper clay that I molded to form a slope.  Remember, paper clay shrinks.  You will not have a perfect imprint once your clay is dry, be advised.  Once your form starts to dry a bit, I recommend taking it out of the box to dry quicker.  I am inpatient, to speed up the drying of the clay even more, I baked it in the oven at 250 until hard.  It took mine a good hour due to the thickness of the piece.  


Now is the time to attend to collaging the background in your piece.  This is another opportunity to add layers and interest.  This time around I played with the seaweed fiber set and layered in some collage sheet elements from the sea shore collage sheet and K and Company's varnished postage stamp paper.   I used matte medium to glue down my fiber bits. Then I gathered items to assemble into the project.


Keep in mind it is a good idea to include things that are of a different scale, this is how you achieve interest.  Also items tend to look better placed in odd numbers.  I used E6000 to start gluing in my ocean treasures.  I was sure to audition each piece before adding glue to them.  Shells, starfish, a bottle of garnet sand, sea glass and more tiny shells are all fun items to include.  Most of these smaller items were glued down with matte medium.  I find that this disappears the best and really does hold pretty well.  Inside of my sandy bottle I included a secret note and a few tiny clam shells and tiny seahorses.


I made a handy sandy paste that dries rock solid and I think will have many crafty uses.  Here is the recipe:  one part Glossy Accents, one part matte medium and two parts sand.  I simply mixed it in a small resealable container and I just keep adding to it when I start to run low.  My measurements are rough and approximate, you can tell when the mixture starts to thicken too much, you want it to still have some viscosity.


Slather on your paste behind where your focal is going to land, filling in any edges from the paper clay shrinkage.  I used a popsicle stick.  Add glue for your focal and place it where you would like, for this large piece I used E6000.  I added a bit of my sand formulation over the edges of the shell and over the rest of the paper clay bank.  I think this helps it to blend, and it works as an extra adhesive.  I also added more tiny real seashells at this point, making sure they had good contact and were wet with adhesive. 


To finish off my box I added a decorative border of shells.  I also glued down some brass shell corners and a brass shell scroll that were altered with Liver of Sulphur Gelguilders paste and then a coat of picket fence stain. Yet another great example using the rule of three when distressing an element for a project.

I hope you learned a little something along the way.  Assemblage art is such a fun way to tell a story, thanks for joining me as I tell mine.

Cheers,

Rhea

Saturday, April 7, 2012

My Olde Curiosity Shoppe

I am so happy with my latest project.  The new line Graphic 45 recently released, Olde Curiosity Shoppe, is simply amazing.  I have had my stack for a while and yes, I had to talk myself into cutting it. 


The tray was picked up at my not so local crafty outlet store. I love, love, love this place and usually make the hour trip about once per month.  I would be in trouble if it were closer.    I paid about five bucks for the tray because there were a few scratches on it. 


I am not sure where I found it, but the button is a treasure.  It is from the Detroit Police, close to where I grew up.  In order to add texture moss was added. It makes for a nice curious bit for my tiny shoppe.  In order to achieve more dimension I layered paper and also used tall glue dots to raise some of the imagery from the back of the tray.   Some of the butterflies are also popped off the page for interest. 


Here is a bit more moss too.  I kind of went with a flora and fauna idea when searching for my curiosities.  I had some shells out on my work table and thought they were a fun addition to my assemblage. Lots of distress stain was also used to make my edges finished and old looking.  I cannot live without this stuff.   


I could not resist adding a tiny gadget, otherwise known as a watch movement.  Who would have thought I could include nature and industry in one piece and have it actually look cohesive?  Thanks to Graphic 45 for that one!


Lots more metal goodness here.  I aged some of my new stuff to make it look old.  I rusted the pen nib as well as the clock charm.  The tiny clock key was altered a bit with some black acrylic paint.  I was not even searching for that little doodad, but knew when I stumbled upon it that it had to go in this piece.  The old watch spring was crammed into a tiny bottle alone with another coil of wire. 


More fun stuff in these little areas too.  The paper had a nice image of the women's legs in a bottle.  I cut off the bottle off the image and used their idea by adding it to my own little bottle.  This was the perfect project to add another one of my little apothecary domes with a mushroom inside.  So super fun and cute.  I thought  the Girl Scout pin was another unique addition. 


I have been hanging on to this large clock key for a long time.  It was a score from my dad.  He has the best stuff and once in a while I get to partake.  This project is the perfect place to display it.  The flakes inside of the jar are burnished mica flakes and they are available at Alpha Stamps.  They also have all this wonderful paper over there and apothecary domes too.  Yes, they are my favorite shop due to my wonderful new Design Team appointment. Their shop is worth exploring!


 Another clever trick.  I mounted some left over eggs I had right to my shrine.  I love how this mimics some of the imagery in this paper line.  Most of the trinkets in this project are simply held with matte medium.  It pretty much just disappears.


To finish the tray I added the last of Tim Holtz's box corners.  I am sad my supply is diminished, these are good staples to have in your stash.

I hope you enjoyed browsing my own little Shoppe of Curiosities.  It sure was fun to assemble.  Since assemblage is one of Wendy Vecchi's styles, I am also entering this into Simon Says Stamp and Show's weekly challenge.

Cheers,

Rhea