Showing posts with label mica. Show all posts

Thursday, September 3, 2015

Steampunk Heart Hanging


The inspiration continues after learning so much from Finnabair!  I have also used a lot of her product in this project as well since I am on such a kick.  It was great getting back to a classic steampunk look, my absolute favorite!


The focal of the piece is actually a Masonite kit from Retro Cafe Art that I have been hording for some time.  I added Finnabair's silver micro beads and lots of layers of resin to achieve really great dimensional wings.  For the mica heart I made a great discovery.  I was able to dye my mica with alcohol inks prior to using them to customize the color.  This opens up so many possibilities with the mica I have on hand!


The heart also has lots of Finabair's mechanicals which were also coated with resin.  I love to layer the metal pieces to achieve different looks.


The base of this hanging is a burlap panel.  I love how this provides for a natural texture to begin with.  I also used lots of die cuts, Masonite shapes, metal bits, found objects and wooden embellishments in the collage.  All of it was brought together with the use of gesso, a dusting of metallic finishes and some mica flakes.


I made this piece specifically to keep my big designing dreams alive.  I have not been active with a team for a while and it is part of my creative life that I truly miss!

Cheers, 

Rhea

Saturday, July 18, 2015

Finnabair classes!


I was so excited when I discovered that a scrapbook shop called Scrappy Chic in Livonia, Michigan was going to be hosting Finnabair in July. I decided to have a little art binge and take all the classes and I am so glad I did.  So here I am fresh from two full days of fun, with four classes total and I am here to show off my work.


First up was "Daydreamer."  This was a collage on canvas using darker effects, which I absolutely loved.


As you can see Frida Kahlo was my focal.  I recently went and saw the Frida and Diego exhibit at the Detroit Institute of Arts, so I took lots of inspiration from there. I thought she was the perfect subject for the large headdressess that are signature Finnabair sytle.


The next course was called Over Emotional.  I liked having the chance to stretch myself a bit with an alternate color palate and style. While I don't think it is something I would repeat in terms of color, I am pleased with the outcome.


On of my favorite tricks used in lots of classes lately is adding some pencil at the end.  It is amazing how this small element can really change the level of detail on a piece. You can see some of my doodling at the bottom here.


So much rich and fun texture.  There is so much for the eye to take in on every one of these projects.


The start of day two was a Rich and Textured Layout class (gasp).  I don't think that there has ever been a layout on my blog, because this is just not my thing.  I decided to go with it anyway since I had traveled for the classes and I was glad I did.  There were still lots of techniques and products to try out.  The kits for the classes were beyond amazing, I am so pleased with what I still have left!


The image here came from my dad's stash.  Since he is an antique dealer he has a ton of junk.  I told him about my project and I got a slew of fun cabinet cards to play with! Score!


Last up was the ARTifact.  This was clearly my favorite, with no people to worry about as I am actually not much for featuring people in my work.  Anyhow, the focal here was a paintbrush, again provide by going through dad's junk.  Lots of fun industrial touches were added by the way of gears, nuts, bolts and even some great metal wings.


What an amazing two days of artful bliss!  Thanks so much to Scrappy Chic and of course to Finn for a beautiful presentation of classes. I am so glad I made the trip.


Cheers,

Rhea

Monday, May 25, 2015

Bezel Maddness


So my loyal followers will know that I have an amazing crafty outlet store close at hand.  Well a recent score at said score evolved into a full day of inspiration and fun.  I managed to get a giant bottle of Lisa Pavelka's Magic Glos for only $12.50 when it retails for fifty dollars.  With my trusty UV light I set out to layer it up and boy did I have fun!


As you can see I was quite productive.  I just could not stop once inspiration struck and the product was so simple to use, no mixing!  Now, I love my Ice Resin, but the swiftness of this product for the purpose of layering was just awesome.


Other mixed media supplies used included a ton of Iced Enamels, Art Ingredients (glass glitter, micro beads, mica) Vintaj patinas and gilders paste. 


The one pictured above turned out really cute.  It is so outside of my go to colors and I am proud of myself for being brave and embracing these vibrant colors.  I used turquoise Iced Enamels in the background and Heidi Swap embellishments. Her product stood up well to the resin as they are plastic.


This bezel was inspired by the charm that I found while rooting through my drawers of junk.  I thought that a Dymo label would stand up well to the resin and I was right.  I think adding text in this manner with resin is perfect. In this one I also used some of Finnabair's Art Ingredients.  The tiny silver beads look great suspended in two separate layers of resin.


Another sample with a Dymo Label reads "love" above.  On this one I used the Iced Enamels on the outside of the bezel.  The distressed look is perfect for my style.  These other small projects have all kinds of junk inside: keys, watch parts, washers, glass glitter and shattered mica. 


One feature I really liked with this system was the quickness of the resin set up with the help of the UV light.  I was able to create layers and layers very quickly this way by systematically working on several pieces at a time.


Another experiment with color below.  The turquoise, red and black reminds me of Day of the Dead and I am sure I will find a project for it someday!


I kept the one above on top super simple and just layered different types of shattered mica.  I think may add a rub on sentiment eventually, it is crying out for just a little bit more, as is the faux Drusy below that I experimented with.  I can never leave well enough alone when it comes to my art!


This was such a fun day of pure artistic play, it energized me in so many ways!

Cheers, 

Rhea

Friday, February 13, 2015

Small Steampunk Canvas


For our introduction on the Canvas Corp design team, they asked us to create a tiny 4x4 canvas that represented us.  Of course, I knew I would go with an industrial themed piece.  


I tried to incorporate some of my favorite products while making this fun steampunk niche.  The back of the canvas was used so that I would have a small space to tuck things inside.  I used this project to utilize some completed elements that had not been used like the resin encased tin type and resin filled bezel.


Paper tape from 7 Gypsies was added behind these ladies to add some interest to this background. I also used a lot of gears from 7 Gypsies as well.


The layers of metal embellishments were built up with matte medium.  Lots of copper mica flakes were tucked in as I built up the canvas as well.  This adds a lot of glimmer and glitz.  There are so many little bits tucked inside! To keep the element of movement present in this piece I attached a bird charm that has the ability to swing on the tiny pin.

I hope you enjoyed seeing a project that hopefully represents me as a designer.  Thank you as always for your readership!

Cheers,

Rhea

Saturday, April 12, 2014

By the Sea Book Box


I have been dying to make one of the new smaller Tim Holtz Configuration books since they came out, so when Leslie at Alpha Stamps asked me to create one, I jumped at the chance.  

Here is a rather juicy list of supplies from Alpha Stamps.   


For the theme I decided to go with By the Sea by Graphic 45.  I had so many trinkets to fit this theme, which lead me to my choice.


My favorite things about this substrate is that you can combine collage, bookmaking and assemblage all in one.


Inside I used sand mixed with matte medium to create a sandy scape.  In order to add a bit of flash and sparkle I also added some mica flakes when it was still wet.


The inside cover is collaged with lots of goodies. I used my Xyron to ensure that each bit is covered in adhesive.


I love the beads I just happend to find right before making this, I thougth they looked like little sea urchins.


I also used a few weird treasures that have been in my stash for ages, like that rubber seagull.  He is pretty beat up and I have no idea where he came from, probably a box of junk from my dad.


Here is a close up inside another box.  Lots of layers for interest gives the eyes places to wander!

Cheers,

Rhea


Wednesday, March 5, 2014

Romantic Steampunk Triptich


What a fun project this turned out to be, and I started with pretty much nothing.  I decided to up cycle the chipboard pieces that Alpha Stamps always sends along when you order printed collage sheets.  I turned them into this lovely triptych by using Tim Holtz's arch die, along with the movers and shapers.  You can see all the supplies I used here.


In order to get the plain old cardboard to look like metal, I used metallic stains, ink and gilders paste.  I think it is in the layering of different media that you really get good "faux" results.


In order to create a mystical look, I added a few sheets of mica over each of my images.  I love how this instantly ages the picture.


I added some of Tim Holtz's numeric rub ons through out the project to add a bit of whimsy.  I chose these because they echo the patter in the paper I chose.  I like to use rub ons because they are more dependable than stamping.


The heavy hinges also add a nice weight to this little trifold.  Adding in metal elements to my paper projects is one of my favorite things to do.

I hope you found a little bit of inspiration in the blog post today!

Cheers,

Rhea

Wednesday, February 5, 2014

Mermaids Wanted


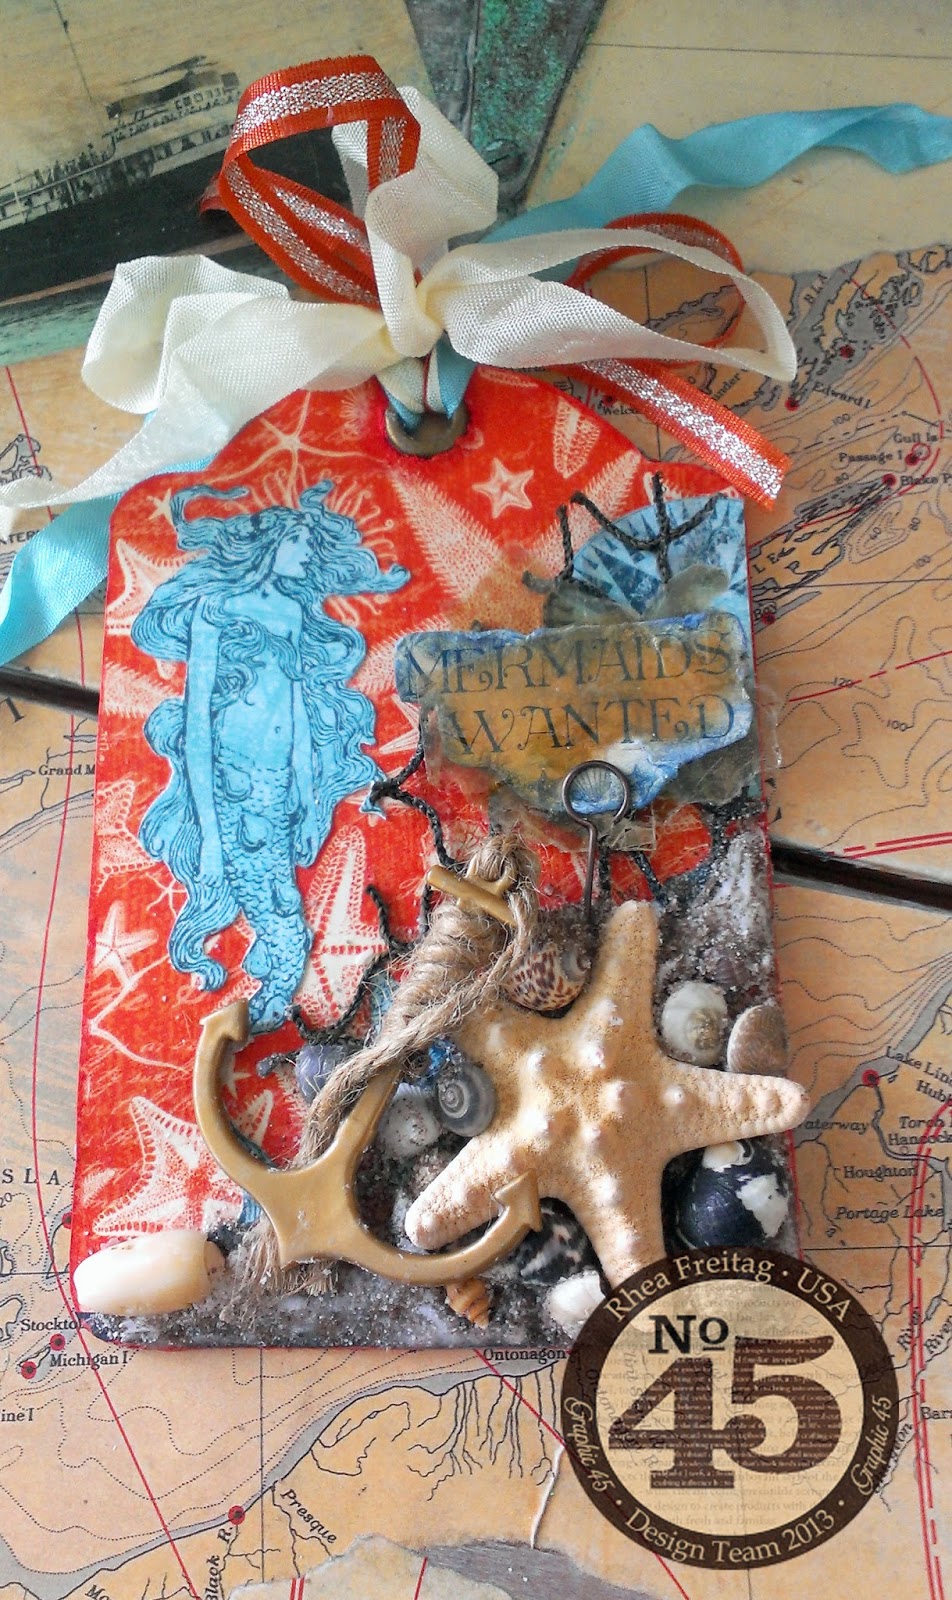
Since I absolutely adore mermaids I knew I had to make this image the focal of my first project with this lovely new paper, By the Sea for Graphic 45.  


I chose a contrasting background that would make the blue imagery of the “My Anchor” sheet pop.  Once I glued down the background and my layered images, I decided to get fun with some ocean themed stuff I had around the house.  I started by gluing down the starfish with matte medium.  At this time I also layered in some netting that went with the aquatic theme.  Then I got crazy with the shells, layering and layering.  


Finally I dusted it with sand, even adding some matte medium in areas to build up my drifts.  I love how the sand added texture.  


The “mermaid wanted” sign is sandwiched in between two sheets of mica to give it a reflective quality.  I finished off the piece with a plastic anchor that I think was intended for a fish tank.  I find lots of cool stuff at garage sales.   


I hope you are now inspired to add a bit of mixed media collage to your next project!  

Cheers!

Wednesday, November 6, 2013

Tiny shrine of Mary


A few weeks back I had shared that I had been on a shrine/assemblage kick again, this post shows off another bit of that art attack.  


I used an Alpha Stamps image that I printed to make a rub on and then adhered that to a sheet of mica.  I just adore how you can see the text through the image.  Yes, I am easily amused when it comes to art techniques that add so much interest in super simple ways!


The edges of the assemblage were covered with my standby, tissue tape.  I also used a ton of gilders paste on this project, in fact this is the only medium I used to color the elements. 


I gave my mom another small similar shrine with religious imagery, I think this one may be destined for her as well!

Cheers, 

Rhea

Sunday, October 20, 2013

Door Shrine with Ice Resin


I have been itching to get back to assemblage making and that is just what I did over this past weekend. This is my favorite art form and I am not quite sure why.  I guess there is something to putting things together dimensionally that pleases my sense of creativity.


To start off I painted the whole shrine kit with black gesso.  I then added my classic touch of gilders paste in silver.


The ornament on the door of the shrine was made with Ice Resin and a few broken jewelry bits.  I had to layer the resin on twice to get the effect I was looking for.  I backed the door with text and a layer of mica to add more interest and create dimension.


The inside of the door is backed with a map and an embossed piece of Spellbinders metal sheeting, which was aged with more gilders paste.  I chose the image of the compass because for me this represents new direction.


My focals on the inside are made from a few resin creations I made this weekend as well.  Here I have used some very fun techniques to create interesting textures in the resin.  I have embedded mica and I also used perfect pearls to color the resin.

I hope you enjoyed my little Door Shrine, stay tuned for more dimensional assemblage, I was a busy bee this weekend!

Cheers,

Rhea

Thursday, October 17, 2013

Ice Resin Bee Necklace


I have been so excited to use the bezels Spellbinders sent me as they are a product partner for Graphic 45.   One of the focals I created includes this amazing Victorian bee brass stamping from Alpha Stamps.


In the background I have layered some text, which really ended up obscured by the mica I added.  I did manipulate the mica a bit to add texture, it really adds depth and dimension that is hard to see in this photo.


On the bee I used many products: gilders paste, Vintaj onyx patina, stickels and permanent marker.  The centerpiece was sealed with Ice Resin.  I had to do this in two settings to achieve the doming effect I was after, and get all of the body of the bee under resin.


I added the focal to a simple chain.  When I wore it for the first time today, this was how I styled it.  I can also chose to wear it in the center.  I tried to add several different elements, but I always ended up editing them out.  Sometimes it is good to keep things simple. 

It was so fun to get back to my jewelry roots, I suspect there is a bit more of that to come now that my dining room table has been transformed into a jewelry making station.

Cheers, 

Rhea