Saturday, September 29, 2012

Steampunk Halloween Apothecary


I was thrilled to be able to make the time to play in Laura Carson's Pretty Potions and Poisons Apothecary Event.  I stocked up on all kinds of fun stuff to play with from Alpha Stamps.  The base of my cabinet is a five dollar garage sale find.  I almost did not purchase this item because I thought that five bucks was too much.  I am now happy I purchased it.  Perhaps it was a spice cabinet in another life?

I added lots of shimmer, glimmer, sparkle and lights along the way so I thought this would be a great entry for the sparkle challenge over at Simon Says Stamp and Show.


Hold on tight, I have a lot of pictures to share with you.  I am not so sure about my camera in my new phone, it does not seem to be as good as my old one.  I think it is way more sensitive to movement.


I mixed at least three different Graphic 45 papers and the transition is seamless.  I love how they make their palates interchangeable.  You can see a bit of their Kraft line, Olde Curiosity Shoppe as well as a bit of the Halloween in Wonderland. 


On the top of my set up I have a bunch of good junk.  An old space bar and typewriter keys, a steamy skeleton couple, lots of clock and time elements and a few light bulbs and flowers finish it off.  


Of course the inside is packed with lots of stuff too.  I altered a few bottles, made a few faux books and added a few other items.  The Altoid tin simply adds height.  I made one faux book from Laura's tutorial.  I did it a bit different though as I used sticky back canvas for my spine.  The other book is actually a sleeve around the battery pack for the small strand of lights that are inside. 


This area is extra special. I made a garland out of wire and charms from an Amulet and Talisman swap I recently participated in.  What a perfect place to display my charms from my art pals.  


Another special item in this assemblage are the eyeballs.  They are made from hand blown glass and they were intended for mannequins back in the day.  A clever technique: the drips on the green bottle were done with hot glue.  After it dried I added a bit of copper guilders paste.  I also love the vacuum tubes peppered throughout the project.  


Here it is closed up so you can see the outside, not nearly as fun as the inside.  I love the pressure gauge at the bottom.  I have had that thing for a while so I am happy it found a place to be for a while.   

Thank you so much to Laura for inspiring us all! This was such a fun event.  Be sure to check her blog to see others work as well as the video series.  There is lots of great information to be had.  

Cheers, 

Rhea

Sunday, September 23, 2012

Bird Song Bliss


This is a project that came out of me like a whirl wind!  I received such an inspiring parcel from Leslie over at Alpha Stamps that it was easy to create something lovely.  First off, I personally think that making anything with Graphic 45 will yield a beautiful project.


This is going to be a photo heavy post for sure.  There are lots of fun details to see.


I love the seam binding that I was able to use both on the closure for the book as well as to tie the art panel inside of the box.  This was the first time I have used this crafty staple and I can tell it is going to be a new favorite, it is really cheap too. 


I went all out with the Birdsong paper, a Japanese Women Collage Sheet, the Song Birds Collage Sheet stickers and a few random embellishments. 


I was quite surprised actually at how many stickers I used.  The world has come a long way with crafting embellishments  that is for sure.  


I used some great resin birdhouses throughout the project.  I was sure to grunge them up with a bit of guilders paste.   I also tricked out some sticker embellishments by taking them apart and adding a layer of filigree.  


I love the metal adornments.  They were sent to me in a swap ages ago and this was the perfect project for them. 


Graphic 45 makes it easy to achieve an intricate look by simply layering their papers. 


This panel is one of my favorites.  I love the coinstucked behind the floral piece.  The paper in the backgound is really pretty too.  I am a sucker for butterflies.  


I made lots of use out of some K and Company borders.  I layered them on this picture.  In a few other layouts I actually cut the butterflied out and used them individually to create flocks of butterflies. 


I really loved the cherry blossom stickers I picked up by Martha Stewart.  I totally yearned for another pack. 


This is another one of my favorites, perhaps it is that butterfly paper that gets me, as it is featured in this spread as well. 


To add a bit of whimsy to this piece I also peppered in a few used postage stamps.  I thought this added a unique touch.  


I also added a bunch of charms to the closure.  I love layers and movement, so the more the better here.  Much of this stuff can be found in Alpha Stamps new jewelry stuff category.  Isn't that Quan Yin charm darling. This is always my favorite part of my kits!  Another big score was a tassel tool, I can see this coming in handy for lots of projects.  


Thanks for taking the time to check out my work.  As always, I really appreciate all of you who stop on by!

Cheers, 

Rhea


Sunday, September 16, 2012

Steampunk Cabinet Card Curiosity


One of my recent Alpha Stamps assignments included the creation of some interesting old relatives.  We were asked to alter two cabinet card cover sets, making each of our relatives have a curious element or trick.  I really struggled with the content, but here is where I landed with one of my projects.  There is a swap afoot if you are interested.


I used the same dude in my steampunk card.  He was quite popular with the design team ladies!


I went with a grungy look, using embossed aluminum tape to bind the book.  Lots of seven gypsies rub ons and metal hardware add to the industrial look.  


I used some old acetate from packaging to add a curious element to the project.  I was able to float the goggles and gears by doing this. 


Stay tuned there is another cabinet card installment coming soon. 

Cheers, 

Rhea


Saturday, September 8, 2012

Halloween Charm


One of my favorite Yahoo groups has to be Art Charms.  I love making tiny little bits of art and trading them with artists all over.  Last year I did not partake in the Halloween antics and I really missed out, this year I was able to join up at the last minute.


The brass ghost has been altered with both black and white Guilders Paste.  Love this stuff!  I used an acrylic sealer to ensure that all my hard work would not wear off. 


The brass stamping base was colorized with Vintaj patinas.  This was my first time using these, even though I bought them ages ago because I "had" to have them.  I do love the finish they created.  It really looked like enameling before I covered it with stickels.  


On the back I also added a tiny little moon detail.  This too was touched with a bit of Guilders Paste to age it a bit.  They were charms that I simply cut the loop off of and then glued with a bit of Hypo-Cement.  Very handy glue, but I always hate that it oozes out as you try to get that needle cap back in.  Ah the joy of crafty "stress."

Stay tuned for lots more Halloween goodness, it seems it is that time of year and I am embracing it.

Cheers, 

Rhea

Sunday, September 2, 2012

A Retro Halloween

It was almost exactly one year ago that I discovered the joy of Retro Cafe Art and their amazing Coffee Break Designs. I had gone to an art retreat in Chicago and they had a booth there.  I went nuts on all their Masonite goodies and developed quite a stash.  Recently when I saw on their Facebook page that they were having a Halloween art contest, I knew I would celebrate by using some of my coveted supplies.


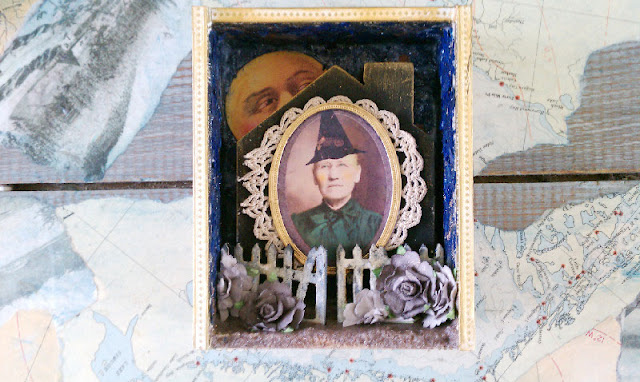
The first entry features two images from RCA's current free collage sheet.  I made the moon peek over the side of the house and I love the altered cabinet card witch.  


I used mica and glitter to line the inside of a smaller cigar box.  The sandy paste I have used in other projects. In fact, this was left over from this post.  You can hop on over there if you would like the details on how to make the paste. 


Other items used on this project from Retro Cafe Art are: picket fence cut outs (these are so handy people), guilders paste and the wonderful star washi tape.  I am a sucker for designer tapes!  The lace was actually cut from a doily and the house base was found at a rummage sale.  A fun project indeed.  

The second little assemblage I put together is also filled with RCA supplies.  I started with a three hole cubby.  This was altered with guilders paste and decorative tape.  You can also see the use of those fences again.  All of the Masonite products accept the guilders paste very well.  


I used their tiny heart shrine, two sizes of red cotton spun mushrooms as well as a Halloween paper cut out.  I was a little surprised at my Retro craft stash!  


I guess this is the official start of the holiday season in my crafty world!  Here we go!

Cheers, 

Rhea